
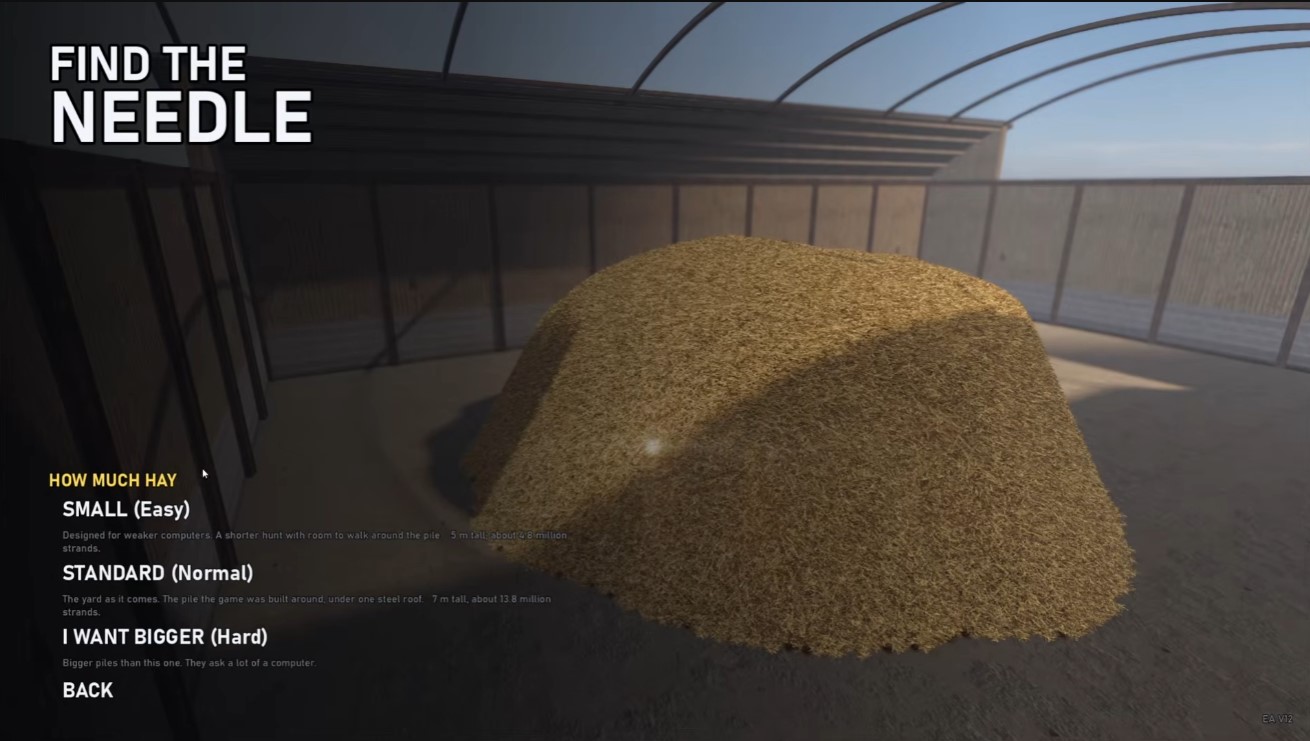
Before You Commit to a 100% Run
A full completion run of Find The Needle is a time investment, not a skill check. The bottleneck is collection throughput, so the order you buy upgrades in matters more than how fast you click. If you are chasing 100%, plan your upgrade path around the tools that multiply hay income before anything cosmetic or convenience-based.
- Expect a grind wall. Later upgrades cost enough hay that a single collection session will not cover them — budget multiple runs per purchase.
- Tool unlocks gate progress. Some hay sources and collectibles sit behind tools you have to buy first; skipping the tool tree stalls your completion percentage.
- Collectibles are easy to miss. The core loop pulls you toward hay, not toward hidden pickups — sweep each area deliberately before moving on.
If you are only here for the ending, you can skip the collectible sweep entirely. The 100% route is for players who want the full completion counter filled, and it roughly doubles the playtime.
Manual Hay Farming and Early Upgrades
Your first hour is a hand-cramp simulator on purpose. Every dollar you earn pulling strands out of a haystack by hand funds the tool that replaces your hand. The goal of this stretch is simple: stop farming manually as fast as possible, then push the sell bar to unlock the wider farm.
Pulling Strands by Hand
Hold left click on a haystack to pull out strands; your bare hand carries one strand at a time. Right click throws hay, and the sell stand converts it to cash. This is deliberately slow — treat it as seed money, not a strategy.
- Grab a few handfuls, walk to the stand, sell, repeat until you can afford your first capacity upgrade.
- Don’t overthink routing here; the manual phase is short and the tech tree is where the real time savings live.
Tech Tree Priorities
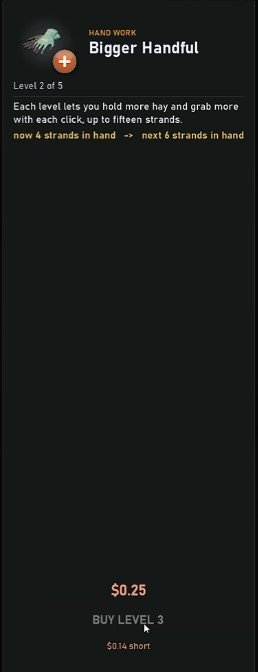
Open the tech tree and spend on capacity before anything else. Larger Handful levels 1 and 2 raise both your grab amount per click and your carry cap, up to 15 strands. More strands per click is the single biggest multiplier on manual income, so it pays for itself almost immediately.
Once capacity is up, buy the faster belt motor. It speeds up every conveyor belt on the farm — dead weight while you’re still hand-farming, but it’s the backbone of the automation you’re building toward, so get it before the price curve bites.
Also pick up the selling multiplier (5% more per level). Every hay sale feeds it, so it compounds across the whole run — grab a level whenever spare cash is sitting idle.
Your First Tools: Shovel, Bucket, Spade
Keep selling until the progress bar fills. Buying upgrades along the way does not slow the bar, so spend freely as you go. The shop unlocks your first real tools:
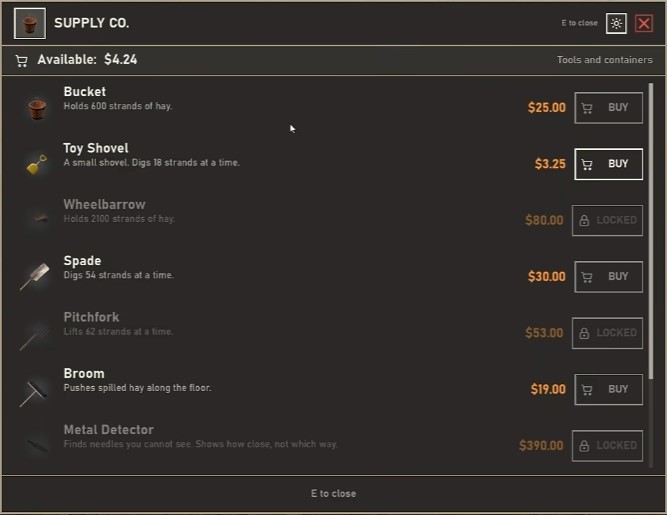
- Toy shovel ($3) — holds 600 hay and digs 18 strands per swing. Cheap, and instantly better than bare hands.
- Small shovel — the workhorse. Digs 18 strands at a time and teleports the hay straight to you. Press 1 to holster it and fall back on bare hands if you need to.
- Bucket — holds 54 hay. Aim at it and right click to dump your whole load, then empty it into the stand. It’s your bulk-transport option for medium hauls.
- Spade ($30) — digs 54 strands per swing, a straight upgrade over the shovel. Press Q to set tools down on the ground.
Upgrade shovel capacity as soon as you can afford it — 72 strands, then 81. Higher capacity means fewer trips to the stand, and trips are where your time actually bleeds out.
Don’t sprint while carrying a load. You’ll drop hay and lose the haul — walk it in.
The Dig-and-Dump Combo and the Needle Cabinet
Once you own a bucket, run the core money loop: dig with left click, aim at the bucket and right click to deposit, then empty the bucket into the stand. A single clean cycle nets about $30 — reliable income while you bankroll the next tier of upgrades.
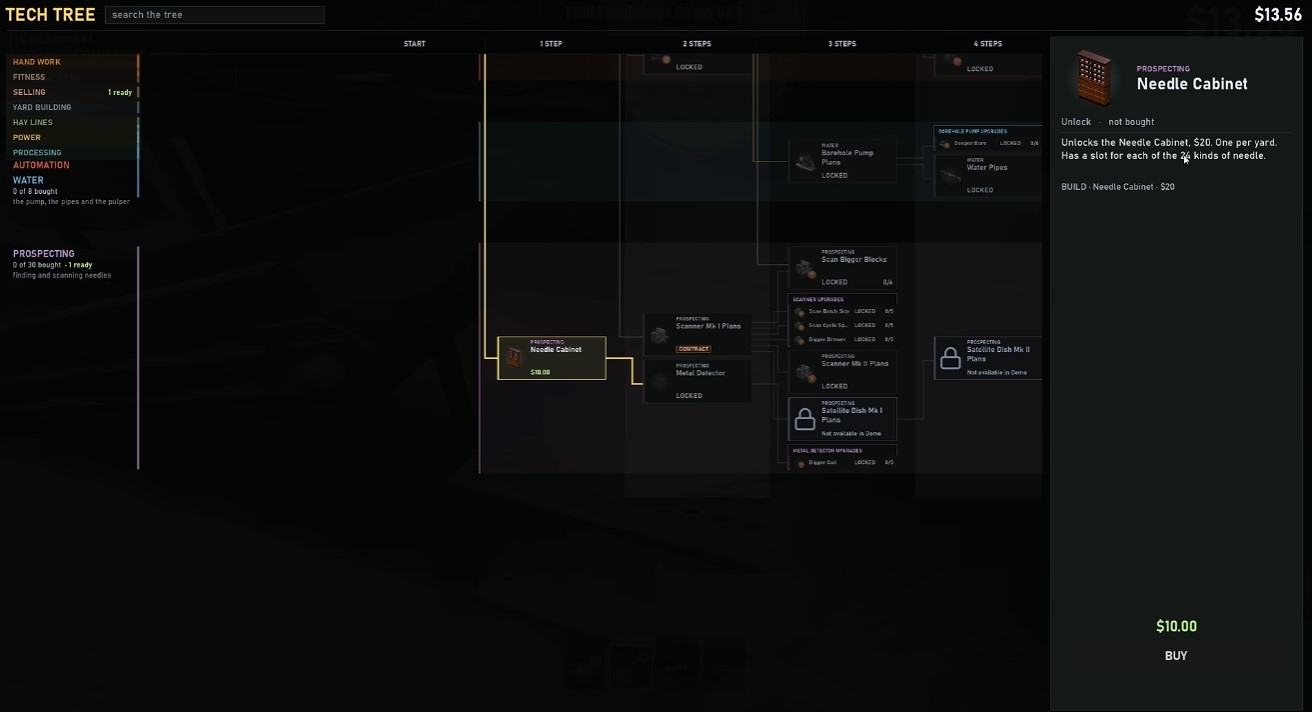
Set aside $20 for the needle cabinet. It has a slot for each of the 24 needle types, and filling every slot is what a 100% run hinges on. Buy it early so found needles have somewhere to go instead of cluttering your inventory — then drop needles in as you find them rather than hoarding them for a later sweep.
Automation and Conveyor Setup
Manual hauling caps out fast once the pile grows taller than your reach. The jump from hand-digging to a powered line is the real mid-game gate: electricity, a hay generator, and a belt spine turn a stamina-bound grind into passive income while you hunt needles.
Buying the Automation Spine
Open the tech tree with Tab and buy the conveyor plans for $40, then press B to open the build catalog and lay belts. Belts run at 7 m/s and cost $8 per meter, so plan the shortest line from pile to dump point before you start placing — every extra meter is money you could spend on upgrades.
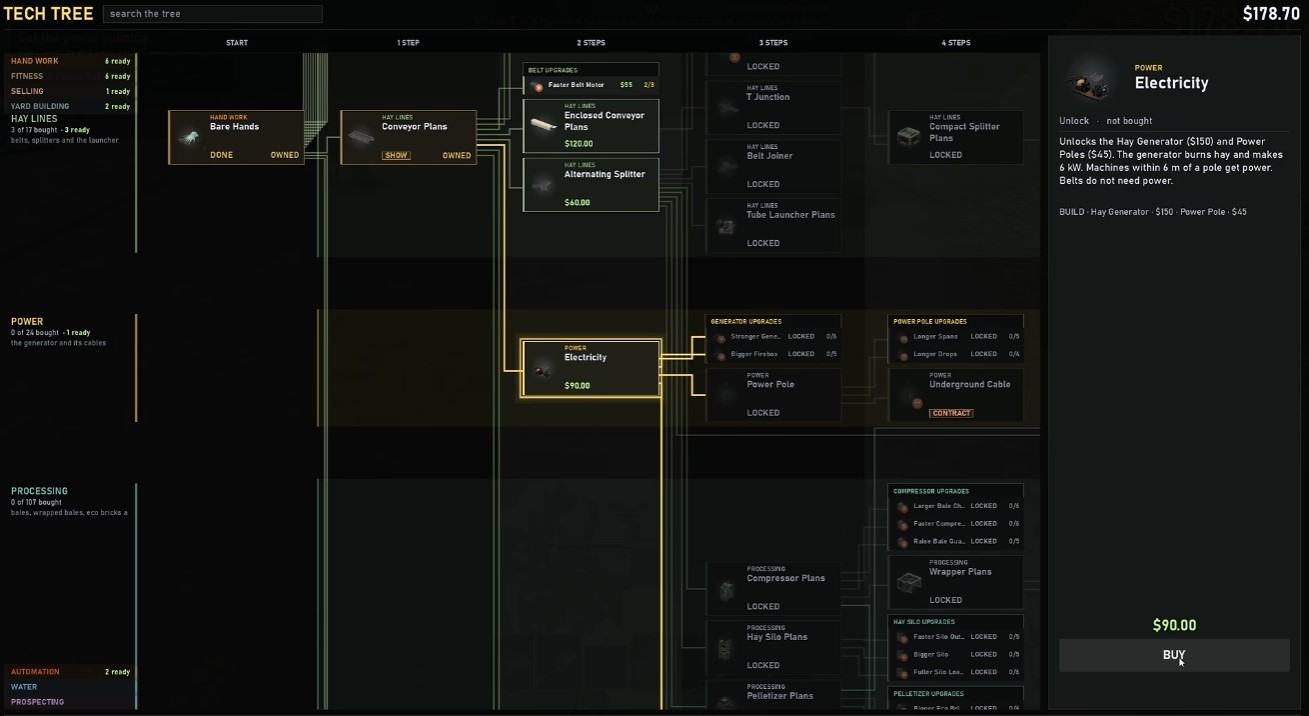
Electricity is the unlock that opens power poles, generators, and machines like the piston rake. Without it, nothing on the line runs. Buy it before you invest further in belts, or you’ll have a conveyor that moves nothing.
Powering the Line
The hay generator burns hay for up to 6 kilowatts. More hay fed in means more output, but if it starves, every machine on that line slows down. Keep the generator close to your machines and feed it steadily.
- Place power poles to bridge the generator to each machine; range is limited, so space them to cover the whole line.
- Press E at a machine to power it once connected.
- Watch the power overlay — red means no power. If a machine sits idle, add poles to close the gap.
- Dismantling a generator can break the line; recheck connectivity after any teardown.
Upgrade the generator whenever you upgrade tools. A line that hits 100% efficiency at current draw will brown out the moment you add a faster rake or arm.
Machines That Move Hay For You
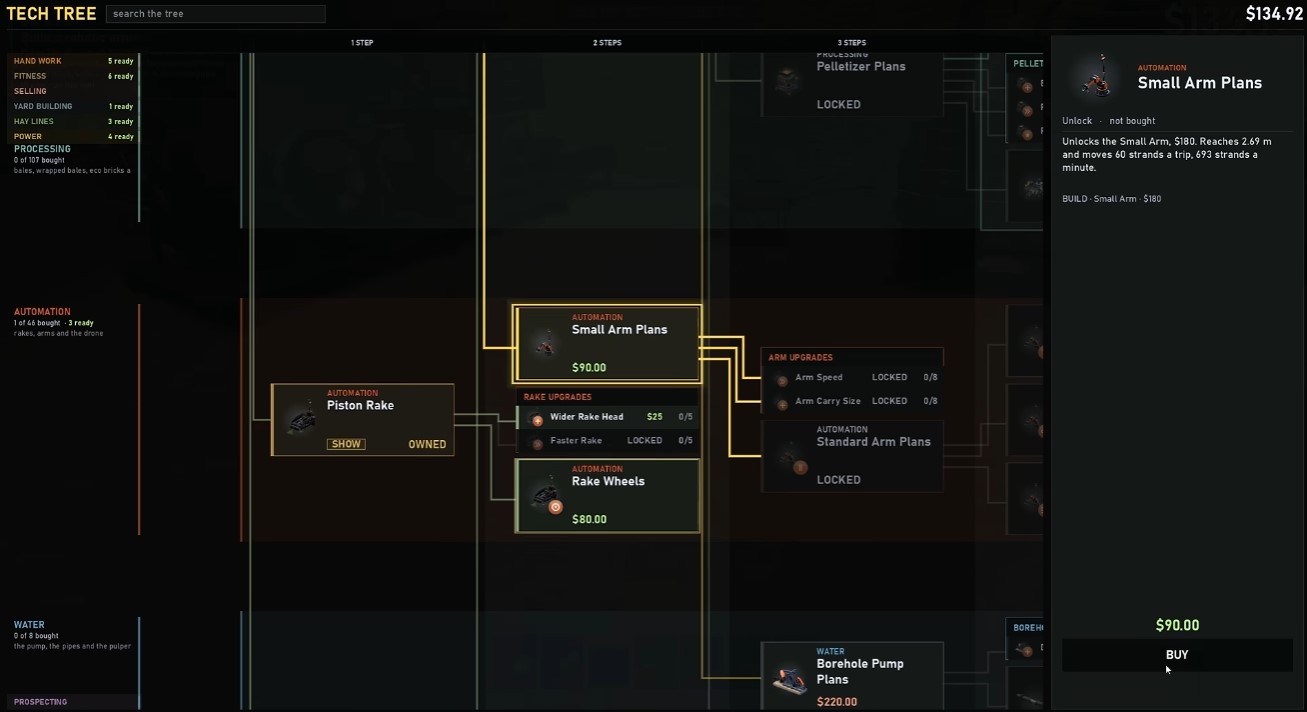
The piston rake is free — grab it from the build catalog and set it facing the stack face. It digs into the pile and throws hay behind it, its small arms reaching and moving about 60 strands per cycle. Position matters: face it into the pile for maximum throw.
Add a small arm (plans cost $90) between the stack and the belt, then set it to pick up loose hay and drop onto belts. Configure it to ignore loose so it prioritizes bundles from the pile first — bundles are worth more, and this keeps the belt fed with the valuable stuff.
For throughput, run one belt with a splitter rather than two belts off a single arm. Standard arms often outpace small arms for raw speed; test both layouts and keep what flows.
Belts, Splitters, and Joiners
Build a splitter to divide one belt into two, and a joiner to merge two belts into one — essential once you’re pulling hay from multiple sources. Splitters can be reversed into combiners with an upgrade. Lay joiners early; you’ll need many as the operation scales.
The dump hatch ($40 each) empties a full bucket or barrel onto the belt below when you walk up to it. That’s how you feed the line in bulk without hand-loading every strand.
Stamina, Loadout, and Sale Upgrades
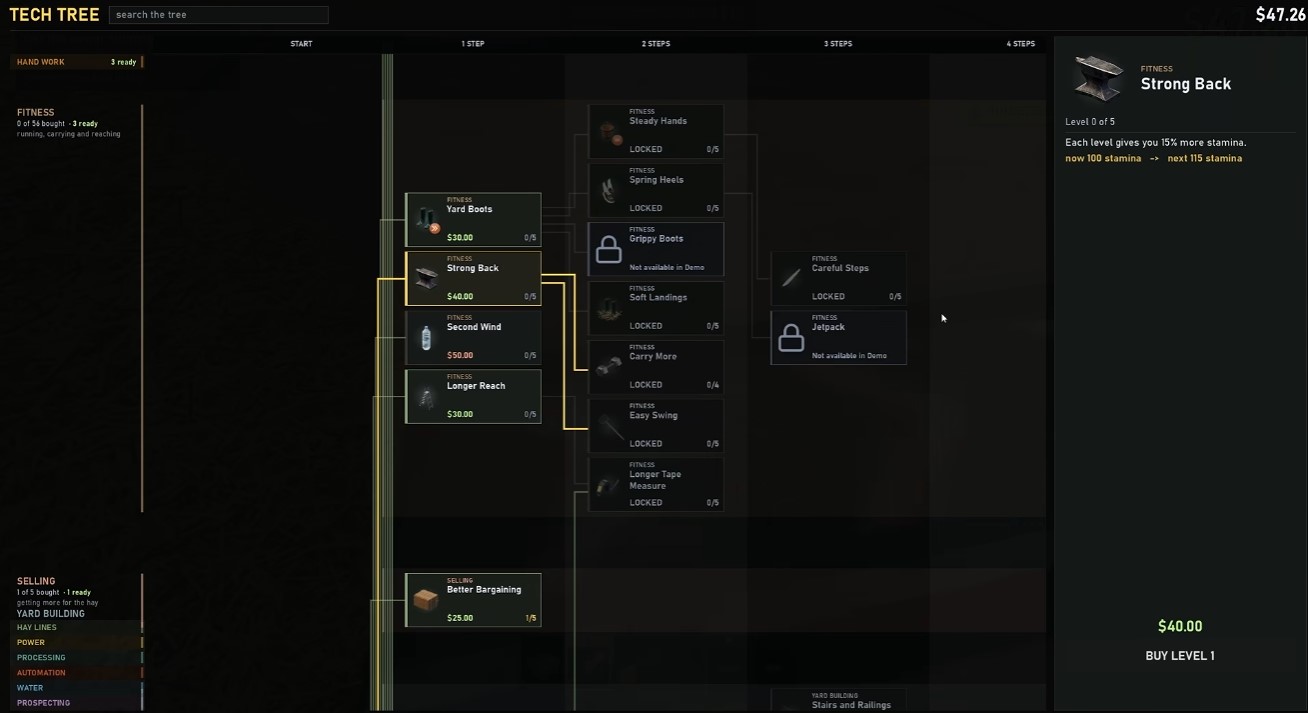
Stamina is the early bottleneck. The Strong Back upgrade adds 15% stamina, cutting the panting and downtime that stalls digging. Grab coins that shoot out from the stand to top off stamina between runs.
- Pitchfork upgrade costs $53 — better hay handling than the default tool.
- Wheelbarrow costs $80 and holds 2,100 strands, letting you sell a full contest load without being capped by sale speed. Skip it if your belt system already moves bulk.
- Shed expansion platforms run $10 per meter and let you and your machines stand on them — needed for vertical automation later.
- Buy the faster belt upgrade to raise throughput as volume climbs.
- Better Bargaining pays more per sale and compounds with everything else.
Dumping a large amount of hay at once triggers a combo that boosts the payout. Use the wheelbarrow or dump hatch to dump in bulk and maximize it — never trickle hay in small handfuls.
Later upgrades: the borehole pump pumps water and is required for deeper automation. Leveling the rake raises its throw chance from 35% to 50%, but higher levels burn more energy — balance rake levels against generator output so you don’t starve the line.
The Metal Detector and Needle Hunting
The metal detector costs $390 from the shop. It beeps faster the closer you are to a needle but shows no direction — hold it, press the scan button, and sweep the pile while following signal strength. Save for it once automation is running; it’s the tool that turns blind digging into targeted hunting.
Advanced Machinery and Contracts
The order board by the bay door is your throttle for this whole stretch: every delivery you clear unlocks the next tier of plans, and the truck never waits. Read the request with E before you spend a dollar — the loadout you build should match the bale type on the manifest, not the one you happen to be producing.
First Contract: Twenty Bales and the Compressor Line
The opening order wants 20 bales loaded onto the truck. Buy the compressor plans under processing, drop the machine onto a belt, and it will crush 60 strands of each bale into 15 bales per minute. Compressors draw serious power, so confirm your generator headroom before the belt starts moving — a brownout mid-order stalls the whole run.
- Build a second compressor plus a splitter so one hay feed keeps both machines fed instead of starving one.
- Watch bale placement on the conveyor: invalid spots drop product and waste strands.
- Do not let finished bales get sold off the line while an order is open — manage inventory against the manifest.
- Take the compressor speed upgrade early (the 25% tier is the better buy). Splitting into a second machine later costs more energy than one fast unit.
Scanner MK1 and the Wrapped Bale Order
Clearing the wrapped bales contract unlocks the Scanner MK1 plans. Mount the scanner at the tail of the belt — it inspects 20 strands at a time, halts the line the moment it flags a needle, and stays stopped until the drawer (8 slots) is emptied. That halt is the point: it is your only automated needle catch, so never bury it behind a machine that keeps feeding.
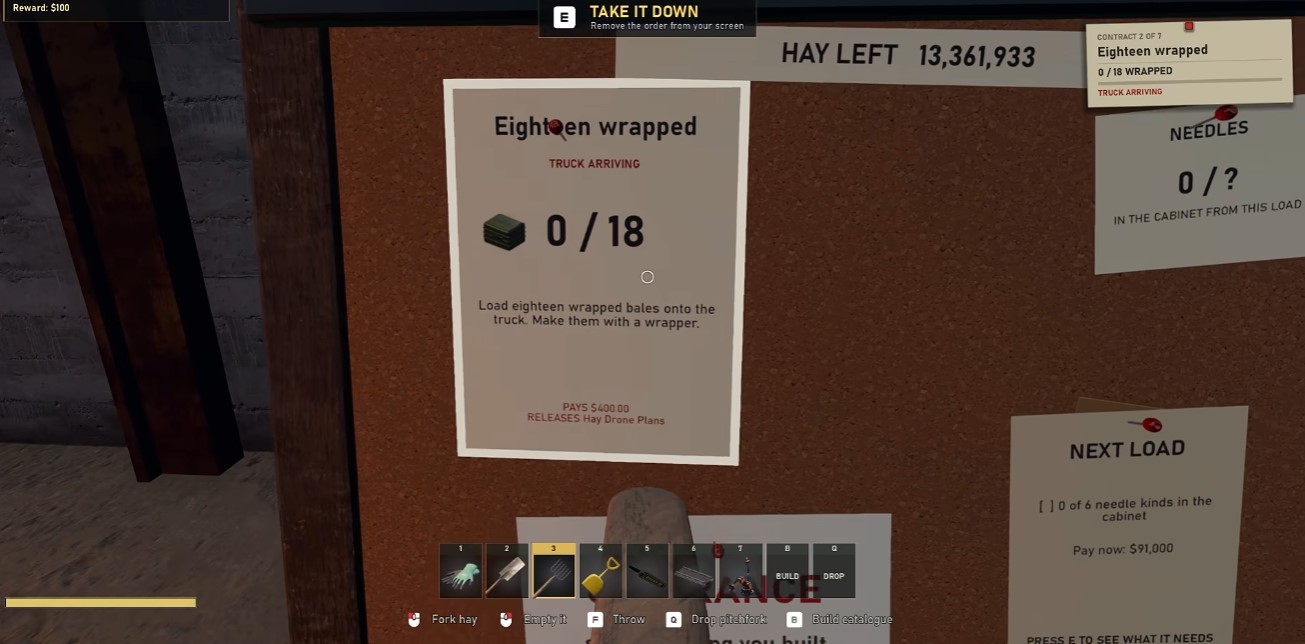
- Build the hay wrapper to produce wrapped bales, but only after the compressor can keep pace — a slow compressor starves the wrapper.
- Integrate the scanner directly into the conveyor line and add arms to load items onto the belt.
- Run power poles down the line so every machine, arms included, stays energized.
- If the scanner becomes the bottleneck, upgrade its speed and size rather than adding a second unit.
Eco Bricks, the Pelletizer, and the Fifty-Brick Contract
The pelletizer converts hay into eco bricks that sell for 2.5x loose hay, and at $600 it pays for itself fast. Once bricks are flowing, the compressor line is arguably obsolete — phase it out if brick throughput beats bale output. The fifty-brick order is the next gate, and the truck bed varies, so expect to hand-load with the wheelbarrow.
- Split the last conveyor line so surplus hay routes to a sell point automatically — backup on the belt kills throughput.
- Keep the wheelbarrow ready for manual delivery when the truck requests more than the line can auto-feed.
- Clearing the eco brick order unlocks hay drone plans and long reach arm plans in the automation tab (Tab).
Discs, Pulp, and the Paper Chain
Disc press plans come next: feed it eco bricks and regular hay to produce discs. From there the chain widens into pulp slabs and paper rolls, which means water infrastructure and careful spacing.
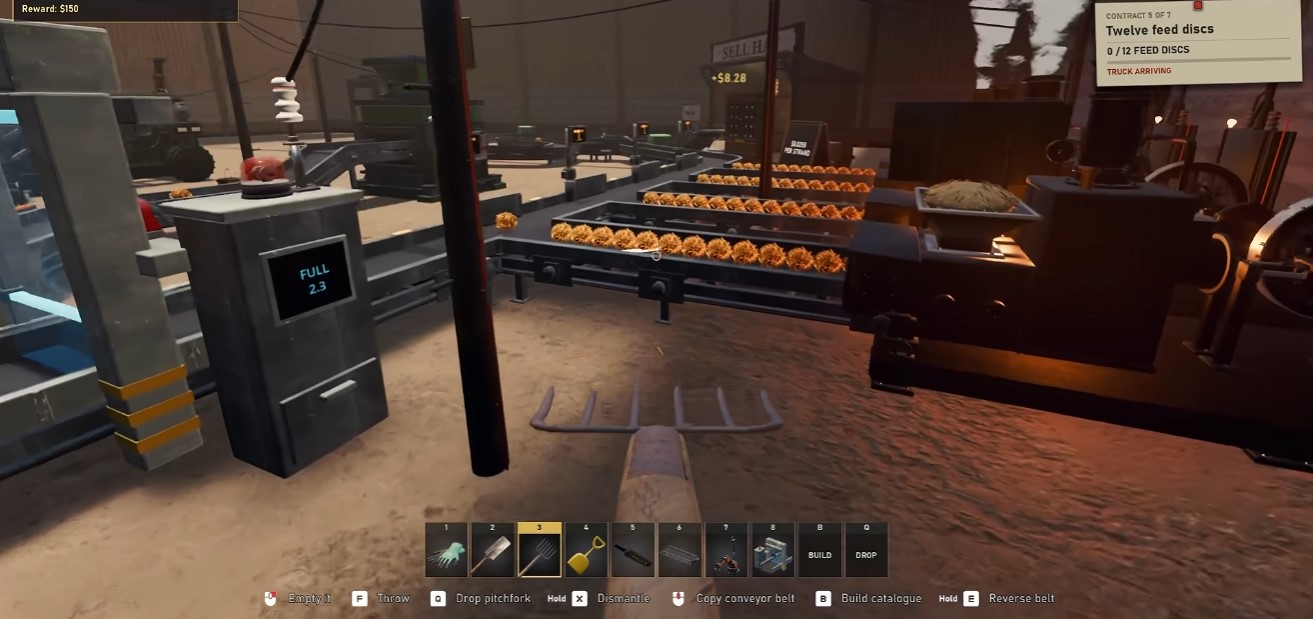
Disc Press and Conveyor Orientation
- Lay conveyor so bricks arrive correctly oriented — test with a handful before committing to full production.
- Route the conveyor path so it does not block downstream machines, and add a power pole to extend supply to the new line.
- Buy the faster feed disc upgrade before chasing sell price; throughput first.
- Add grabbers along the line as load increases — jams are the silent killer of a good layout.
Pulp Slabs and Paper Rolls
- Purchase water pipes and pulper plants, then deploy a bore hole pump and rotate it until it actually connects.
- Space the pulper plant well clear of other machines; leave room for the expansions you know are coming.
- Link the water pipe from pump to pulper, then set the paper mill to convert 3 pulp slabs into 1 paper roll — each roll sells for 60 bucks.
- Rotate or relocate the paper mill to avoid sharp conveyor turns that choke the feed.
- Add a second pump and pipe run once water becomes the limiter, and use underground cables with cable boxes to keep power runs clean across the farm.
Scaling the Farm: Power, Arms, and Automation
Every new machine tightens the power budget. Expand the shed and add generators before you add arms — a “not enough power” warning halts production outright. T-junctions double as splitters for cheap routing, and a single main conveyor with splitters distributes hay more evenly than parallel spaghetti.
- Surround hay piles with long reach arms and upgrade them to max level; arms have a placement cap per stack, so speed upgrades matter more than extra units.
- Configure an auto arm to sweep loose hay into the production line and cut manual gathering.
- Place a hay stack scanner near the hay source, wired to power, to automate collection.
- Take the “scan largest stack” upgrade so scanners handle bigger piles, and set scanners to also read paper rolls for faster selling.
- Upgrade machine efficiency (90% and up) to cut waste, and push more hay into the feed whenever the line runs dry.
The hay drone is a trap. Placing it (B, then E to interact) rarely beats a well-placed ring of upgraded long reach arms — skip it and spend the money on power and arms.
Clear the final contract to open the remaining upgrades, then settle into optimizing hay and paper output. If the line still stutters, the culprit is almost always power headroom or a single jammed grabber, not a lack of machines.
Needle Hunting and Final Completion
The endgame splits into two jobs that fight for the same space: squeezing the last throughput out of the farm, and physically sweeping the shrinking pile for needles. Get the automation stable first, because you cannot hunt while belts are stalling.
Rebalance the Scanner Line Before You Sweep
Overloaded scanners stall detection, so the fix is distribution, not more units. Reposition scanner units so each one is fed from its own line, and reverse a conveyor direction where a single belt is choking the rest. Confirm every scanner is maxed, then add one more only if you have the footprint for it.
- Run a scanner pass after the rework — early checks come back empty, which is expected; the needles are in the pile, not the output.
- Trim redundant generators. The far side of the farm already covers power, so reclaim that floor space for machinery.
- Max grabbers and buy out every remaining upgrade, including ones you are not actively using — the upgrade list is part of the completion check.
Late-Game Hay Clearing
Keep a ring of collection arms around the pile and tighten it as the stack drops. Arms stop reaching once the stack gets too short for the conveyor, so move them inward and wrap another conveyor around the new perimeter instead of rebuilding the old layout. With roughly 100,000 hay left, expect to fit only about three arms before placements overlap.
Accept the lost reach. Rebuilding arms at the old height wastes money you need for the final upgrade buyout.
For vertical transport, hay lifts and stacked conveyors both work; lifts are the cleaner option when you need height fast. A single long belt running to the sell point beats several short ones, and a compactor or multiple belts into the cellar speeds up selling when the pile drains slowly.
What Not to Buy
- Drones: one drone per stack, far slower than arms. Not a mass-clear tool, whatever the price tag suggests.
- Silos: useful for overflow, but they force belt splits and recombines — only worth it if you are already merging lines to kill bottlenecks.
- Optional buildings: the gas plant (burns eco bricks for power), satellite dish (scans the pile and circles every needle), grippy boots (stops the running belt shoving you), and jetpack (flight) are conveniences, not requirements. The satellite dish is the one that genuinely saves sweep time if you can afford it.
Sweeping the Pile with Detector and Vacuum
Buy and place the vacuum to clear the pile, then head up top with the metal detector. If the detector reads nothing, keep sweeping — it can appear to miss needles, and there are six in total to recover. Follow each ping to the needle and pick it up to register the find.
- Clear excess hay away from machine faces with arms so nothing blocks your sweep path.
- Six needles is the hard requirement for this stage. Clearing the landing spot to reset means stripping your placed equipment and buying hay back — a restart with extra steps, so do not trigger it casually.
- After the pile is gone, a hole opens up. Search it thoroughly; that is where the final needle tends to sit.
Pins and Their Buffs
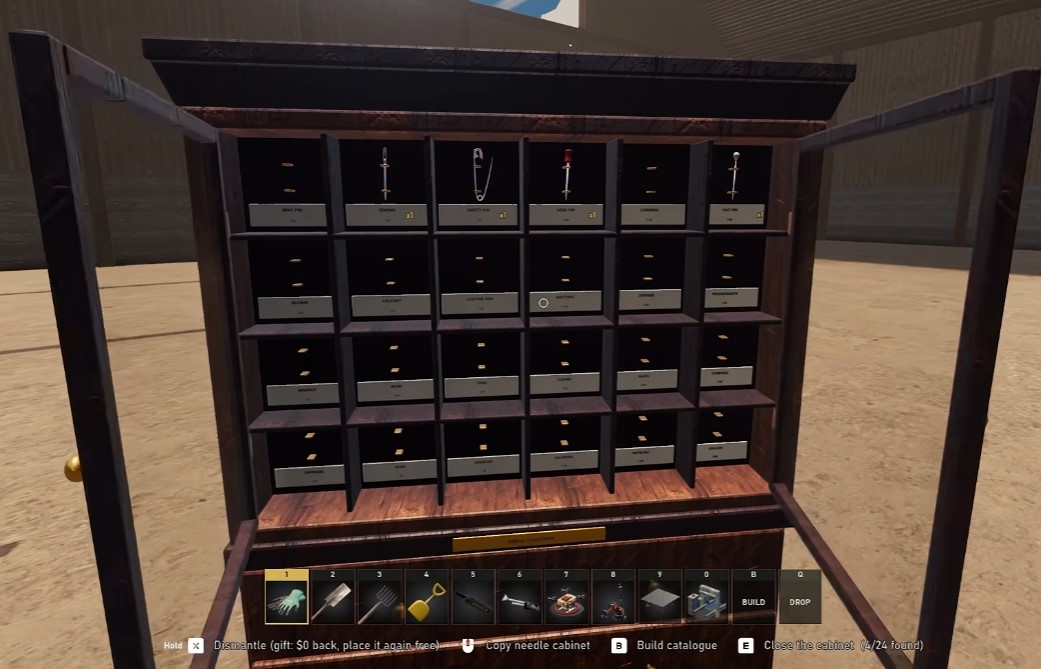
Four pins sit in the endgame: sewing needle, safety pin, desk pin, and hat pin. Their buffs are faster belts, hands/buckets/barrels holding 50% more, hand tools lifting 30% more hay, hay selling for 25% more, and darning giving +30% run speed and jump height. Because they arrive this late, treat them as carryover for later runs rather than tools for this clear.
Filling the Cabinet and Closing Out
The cabinet holds 24 slots, so track your count as you go. Clearing the entire pile triggers the completion sequence and stamps a run time — the reference clear landed at 8 hours, 36 minutes, 25 seconds with a score jump into the hundreds of millions.
- Do not burn needles. Burned needles do not return to the aisle, which permanently blocks a full cabinet.
- If you run a clearance sale to free floor space, know the cabinet can vanish afterward — sell only once you have confirmed your needle count.
- Space upgrades are what let you fit the extra machinery and storage this stage demands; buy them before adding another scanner or arm tier.
Optional Systems Worth Digging Into
- Hay loop fundamentals: Collect hay, sell it, reinvest — treat every sale as seed money for the next upgrade tier, not a payout to sit on.
- Tech tree order: Front-load upgrades that raise hay throughput and stamina before anything cosmetic; early momentum compounds.
- Electricity and conveyors: Once belts come online, route hay straight from collection to processing so you stop hand-carrying loads.
- Power distribution: Connect poles deliberately and keep generators fed — a single unlinked pole stalls an entire line.
- Splitters and joiners: Balance belt lanes with splitters and merge overflow with joiners to keep throughput even instead of starving one machine.
- Truck orders: Contracts pay big but demand a specific production chain — build the chain first, then accept the order.
- Metal detector and scanner: Use the detector to sweep for needles and the scanner to audit production lines for bottlenecks.
- Stamina: Buy stamina upgrades early so you aren’t idling between collection runs.
- Late-game hay pile: Clear the massive pile in planned passes with upgraded tools rather than chipping at it by hand.
- All 24 needles: The full set is the real completion goal — sweep systematically with the detector once your tooling is upgraded.