
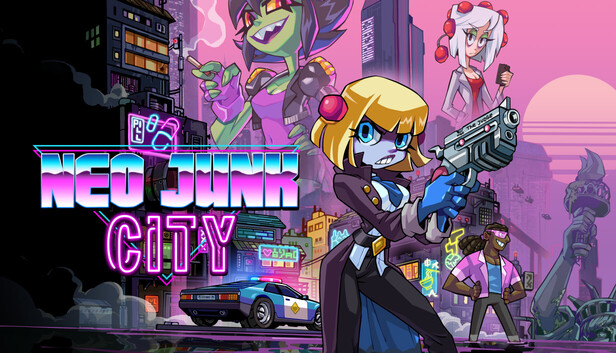
Spoiler warning: This guide names bosses, characters, and several story branching points across all seven verses of Neo Junk City, including the true ending route. If you haven’t finished a verse yet, expect to see its major enemies and choices described here.
I put this together for anyone going for the full set of Neo Junk City achievements and wants directions that don’t waste their time. Whether you’re cleaning up stragglers at the end of the game or planning a route from the start, everything here is organized so you know what to do and when to do it.
I wrote this after working through the whole checklist myself, and the biggest thing I learned is that a handful of these achievements punish you for not saving first — a couple of the verse 6 route choices will outright lock you out of each other. So read the whole verse before you act, and keep a manual save ready. That one habit will save you a full replay.
Overview
What follows is a full achievement checklist for Neo Junk City, broken down by category and by verse so you can work through it in whatever order your playthrough allows. The mandatory story and boss achievements sit at the front, because those come to you whether you’re chasing them or not — clear them and you’ve already banked a chunk of the list before you touch anything missable.
One habit carries through the entire run: save first. A number of these achievements branch or lock each other out, and the ones that do are flagged as you go. Keep a manual save on hand before you commit to any choice that looks like it might matter, and you’ll never have to replay a verse to clean up a single trophy. Everything past the mandatory section is missable in some form, so treat that save as your safety net rather than an afterthought.
Mandatory Achievements
The story hands you these twelve whether you’re paying attention or not — you’d have to switch the game off mid-run to miss any of them. Here’s the full list so you know what’s coming: The Spider, Rob, The Lizard, The Bat, The Hyena, Spirit of the West, Fastest Draw in the West!, The Sidewinder, Cerberus, The Shrimp, Hello World!, and Set.
Almost all of these pop on their own as you push through the verses, so I wouldn’t stress about routing them. The one exception is Fastest Draw in the West!, which is a genuine duel and can absolutely trip you up if you go in cold.
Winning the Duel
If Fastest Draw in the West! keeps slipping away from you, the fix is all about cursor placement. Keep your reticle parked on the edge of the reloading cylinder — that shortens the travel distance to the duelist so your draw lands faster. And when you fire, always send it at the chest. I tried getting cute with a headshot the first time and paid for it; the chest is the reliable target.
That’s the whole mandatory batch. Once these are behind you, everything that follows is missable — and that’s where the manual save habit from earlier really starts earning its keep.
Ark Sidequests
Eight achievements sit behind the Ark sidequests, and they’re worth clearing as a block because finishing all four quests pays out twice. Each Ark quest hands you an energy upgrade at the end, so grabbing all four earns you Juiced as Hell, while simply completing every sidequest unlocks Frenemies. That’s the real reason I didn’t skip these — you’re working on two achievements at once the whole time.
| Quest | Start Trigger | My Rating |
|---|---|---|
| Service with a Smile (Spider) | Grab the Spider’s scissors from the evidence locker after dealing with The Bat | Essential |
| The Show Must Go On (Lizard) | Talk to the Lizard after the Bat is imprisoned | Essential |
| It Takes a Village (Bat) | Speak to the green person after first trying to exit the coffee shop in Soggy Ankles | Essential |
| TAAAAANK! (Hyena) | Talk to the Liger popper next to Sugar’s restaurant after dealing with the Sidewinder | Essential |
| Queen Ghessra | Defeat her during the Bat’s Ark quest | Essential |
| Highway Authority | Defeat it during the Hyena’s Ark quest | Essential |
| Frenemies | Complete all four Ark sidequests | Essential |
| Juiced as Hell | Collect all 4 energy upgrades from the Ark quests | Essential |
Starting Each Ark Quest
For Service with a Smile, the ball only starts rolling once you’ve dealt with The Bat — that’s when the Spider’s scissors appear in the evidence locker. Grab them, head to the Soggy Ankles district, and cut the yapper down from the right side of the screen. It drops a scrap book that belongs to The Spider, so take it back to him. Agree to be his anchor and return to the Cobweb Hotel to properly kick off the quest. One thing that tripped me up: you need to specifically reach the elevator and talk to the robot inside it to get up to the 13th floor — wandering around won’t advance anything until you’ve done that.
The Show Must Go On starts with the Lizard, but only after you’ve talked to the Bat once he’s imprisoned. She’ll ask you to take her back to her studio to check on her viewcount bots. Agree, and bring her x-ray specs along to the studios. Then return to the boss chamber and use her glasses to reveal the entrance to the basement — that’s what actually starts the quest. Easy to overlook the glasses, so don’t leave without them.
To begin It Takes a Village, you’ll meet a green person the first time you try to exit the coffee shop in the Soggy Ankles district. Take the card she hands you to the Bat, then drive back to the castle and follow him to where the graveyard keeper was standing. Buried inside this quest is the Queen Ghessra fight. Beating her is simpler than it looks once you understand the gimmick: just juggle the dynamite the yappers throw by shooting it in the air until it lands on her. Miss the juggle and the sticks fall flat, so keep your shots timed on the toss.
For TAAAAANK!, talk to the Liger popper beside Sugar’s restaurant — he only shows up once you’ve dealt with the Sidewinder. He’ll ask you to take an item back to the Hyena and scoff at her, which starts her quest. That quest runs you into the Highway Authority, a pretty straightforward boss fight with nothing fancy to worry about.
Do me one favor while you run these: scan the new enemies everywhere these quests take you. There are fresh enemy types scattered through all the Ark content, and if you blow past them you’ll be backtracking later for the scanning achievements. I made a point of tagging everything the first time through and it paid off.
Racing Achievements
Racing sits off to the side of the main story, and every one of these gold medals feeds straight into Golden Chariot, so you may as well do them properly the first time. Here’s what each one asks for:
| Achievement | Races Required |
|---|---|
| Neon Gold | Gold medals in races 2, 3, and 4 |
| Ghostly Gold | Gold medals in both Halloween-themed (spooky) races |
| Dirty Gold | Gold medals in the two factory-themed races |
| Desert Gold | Gold medals in the two Route 64 races — the ones with statues in the background |
| Synthetic Gold | Gold medals on the first and final race tracks |
| Golden Chariot | Gold medals on every race |
The races themselves really aren’t that brutal, and I say that as someone who usually dreads timed driving segments. The core rule is to stop slamming into walls and start collecting the boost arrows scattered on the ground. When you do clip a wall, don’t panic-hold the gas — tap the brakes (S on keyboard) and slow down deliberately. A short scrub of speed beats getting bounced around and forced to a dead stop every time. That single habit carried most of my clean runs.
One thing that made the pack races easier for me: while a ground boost arrow is active, you can knock other cars out of the way. Trucks get shoved aside but won’t leave the course, so don’t count on them fully disappearing from your line.
Swerving builds boost too. Hold a turn long enough and your car starts banking a boost — watch the bottom-right indicator and listen for the rising audio chime. The longer you sustain the swerve, the bigger the payoff. I found it worth “feathering” the turn by tapping the opposite direction to correct course: your boost meter won’t grow during the tap, but it keeps you from ploughing into a wall.
Slipstream boosts come from tucking in just behind another car for a few seconds — same bottom-right indicator, same audio cue. Buster 09 is tuned like a maniac with the pedal floored, so your top speed beats everyone else’s. The catch is you have to ease off the gas as you close in, or you’ll rear-end them and spin out. Slipstreaming won’t hand you a mountain of extra speed, but it’s worth using on long straights where there’s nothing to swerve around. And here’s a trap I fell into early: cars don’t pass through each other, so if you see two lined up nose-to-tail, skip the slipstream. The rear one will brake into the front one and come straight back into you, spinning you out.
The starting boost is free gold on every track. When the timer displays “2”, slam the accelerator (W or your controller equivalent) and hold it. Instead of spinning out you launch with a big start boost. It won’t shove other cars aside — only the arrow boosts do that — but it’s still useful in every race.
The two chase races — the Lizard in Neon Road and the vegetoids with the bomb in Route 64 — play by different rules. Racing to the finish line won’t give you gold; you have to knock your target out by hitting them repeatedly. For these, ignore everything except landing hits on the target. Don’t bother boosting unless they’ve pulled far ahead, because reaching the end is meaningless. Boost arrows are still gold here for bulldozing the other cars so you can reach your target cleanly. What wrecked my first attempts was overshooting — speeding past the target and then having to awkwardly slow down so they could catch up, only to floor it again. Stay patient, stay behind them, keep hitting them.
If you fumble any race badly enough that gold feels out of reach, open the pause menu and hit retry to restart the course from scratch. Honestly, as long as you’re not consistently hitting walls and other cars, gold on every track is very doable.
Worth knowing: you don’t have to earn gold on your first entry. Once you’ve got your car, talk to the greaser outside vege fresh and you can retry any previous race, and the game keeps your best time across all attempts. So there’s no pressure to nail it in one go — run the track, learn the layout, and come back stronger.
Verse 1 Achievements
Racing done, this is where the achievement hunting actually begins. Anything I tag with “(save first)” in this section is one you want a manual save sitting in front of, because those achievements come in pairs and the quickest way to grab both is to reload rather than replay the whole verse.
Deadly Truth
At the very top of the game, Buster 09 has to decide what to do with herself. Pick “Turn yourself in” instead of “Break the Law”. She does the legally correct thing, which goes about as well as you’d expect, and the achievement pops. The good news is that the game drops an autosave right before this moment afterward, so you aren’t stranded if you picked the other option first — but save first anyway if you’re being tidy about it.
Professional Detective
This is the one that catches people out. You need to scan every possible target in the entire game, and that starts in verse 1 — not later. Do not assume it’s a cleanup job you can mop up at the end. Fold scanning into everything you do from here on: regular enemies, bosses, everything.
Two things I’d flag as easy to miss. First, the boss fights count, and finishing this means you also need to fight the true ending boss (the Kraken / Hydnellum), so you’ll have to complete Frenemies to make that fight happen at all. Second, during The Sidewinder’s chapter there are Dusty Rose workers wandering around — they’re targets too, and they’re exactly the kind of thing you’ll skip because you’re busy avoiding them. Scan them anyway.
The Hyena’s tank parts are the other classic miss. You need to scan the gun turrets, the missile pods, and the main turret — all of them, not just whichever one you happen to shoot first.
If something slips through, there’s a safety net. At the end of the game, go talk to the scholar — the bird popper up in the tree in Coinrust. Cancel out of making your speech as you approach the crowd, and you should get an option to pay for any targets you missed. It’s not free, but it beats a fresh playthrough, so don’t panic if a scan got away from you.
Music to my ears
This one has its own dedicated write-up — see this guide for the full breakdown rather than a one-line note here.
Curiosity Killed the You
Once you’ve finished cleaning up the crime scene you woke up at, head right and keep going. There are warning signs, and you’re going to ignore every single one of them. Click the edge at the far end to get a jump prompt, and see what happens. It’s not subtle about being a bad idea, but the achievement demands it, so take the leap.
Annoyed with Scrungly / Humored Scrungly (save first)
Both of these happen in the same spot — when Scrungly shows up on the second floor of the Cobweb Hotel — so drop a save before you engage and grab one, then reload for the other.
For Annoyed with Scrungly, don’t acknowledge his game at all. Skip humoring him and just push his barrel despite his protests. Yes, it’s mean. That’s the point.
For Humored Scrungly, play along with his poisoned glass challenge. You’ll want to point out — as a matter of course — that you can’t actually be poisoned, so choose to drink or refuse out of concern for him rather than fear. Don’t hold the attempted poisoning against him, and don’t force him to do anything he doesn’t want to.
Stoned
This is the one I’d most recommend reading before you touch verse 1, because it spans the entire prologue. The goal is to shoot all the bottles for Patty and Nanner, the stoners by the Leaky Lofts. You can technically shoot every bottle before you ever meet them, but Buster 09 only starts tracking your count once you’ve spoken with them. So the order matters less than you’d think — just make sure you visit the stoners at some point, and the tally you’ve built up carries over. After you’ve cleared them all, return to the stoners to collect a tape and the achievement.
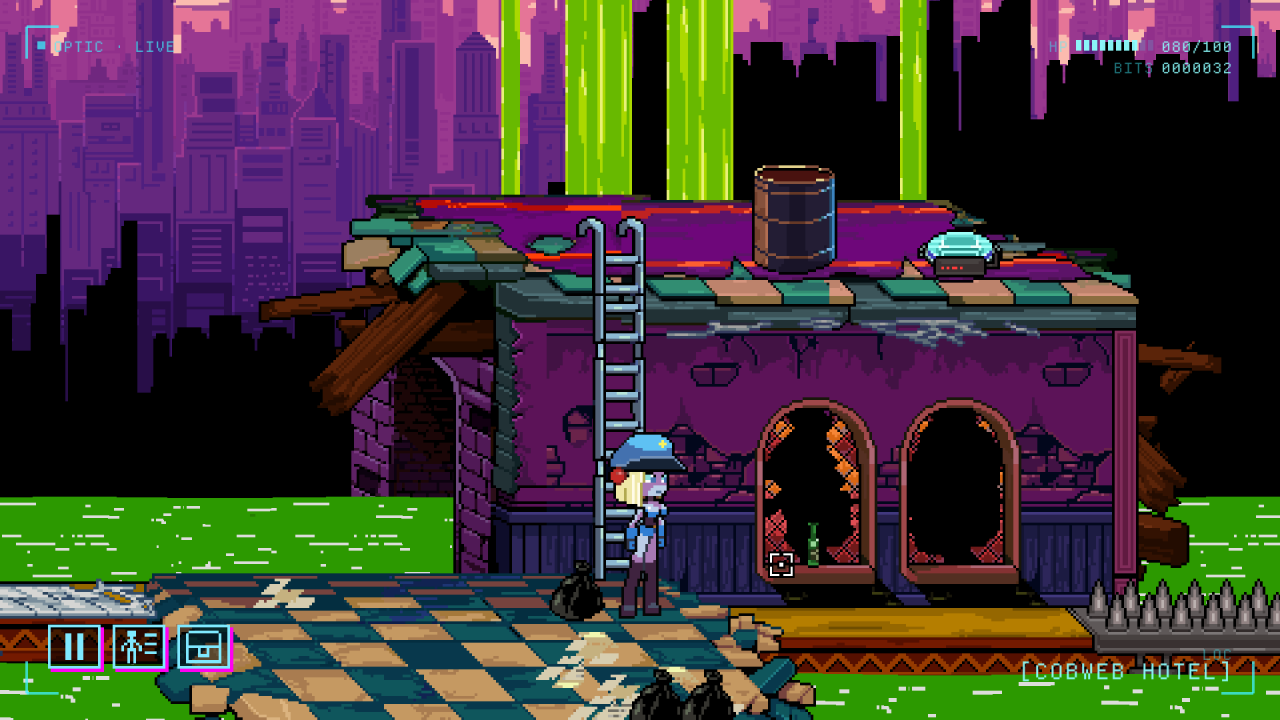
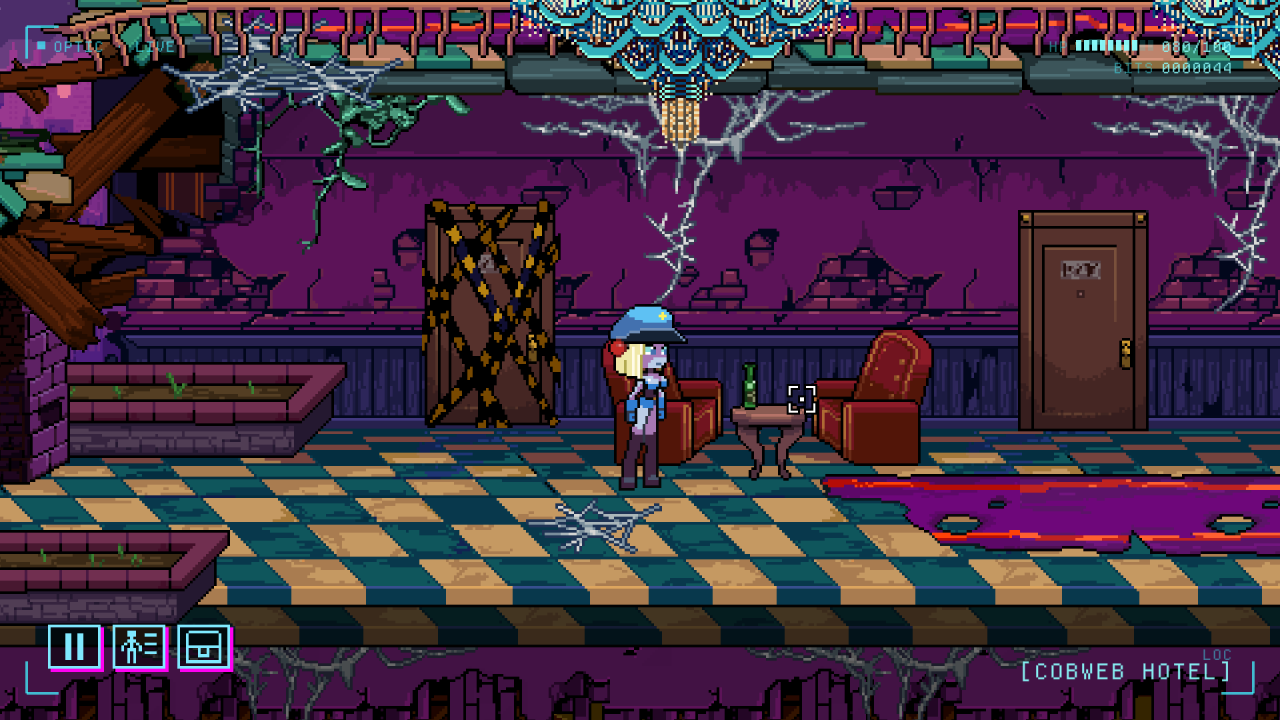
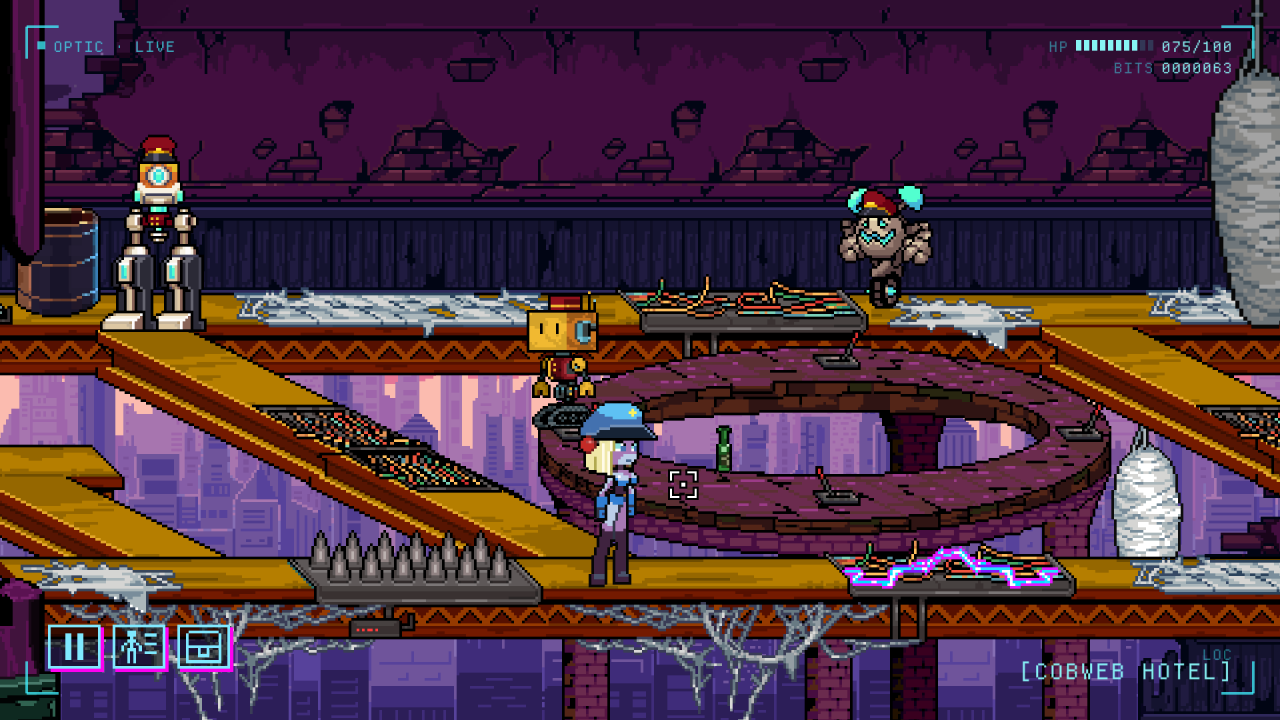
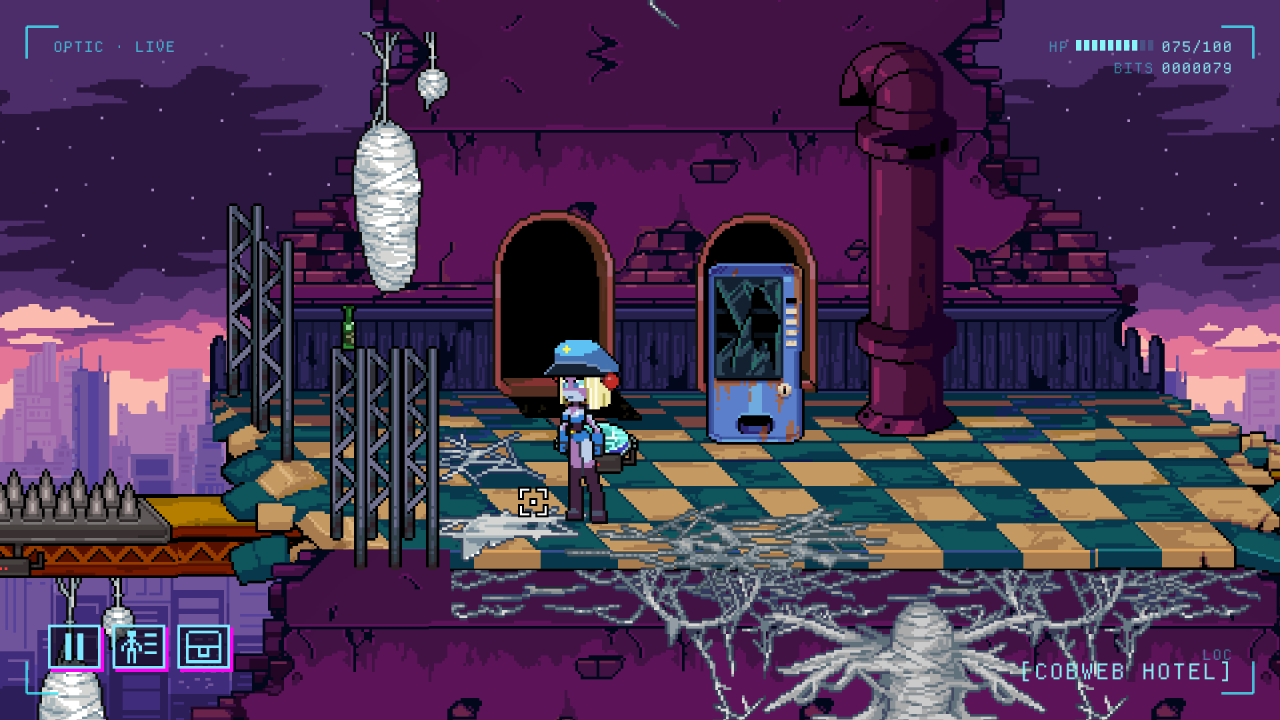
Every bottle lives in the prologue’s area, right up to the The Spider boss fight. Here’s where each one sits:
- Near Mr. Tickles’s lair (to the right of Dr. Celium’s body)
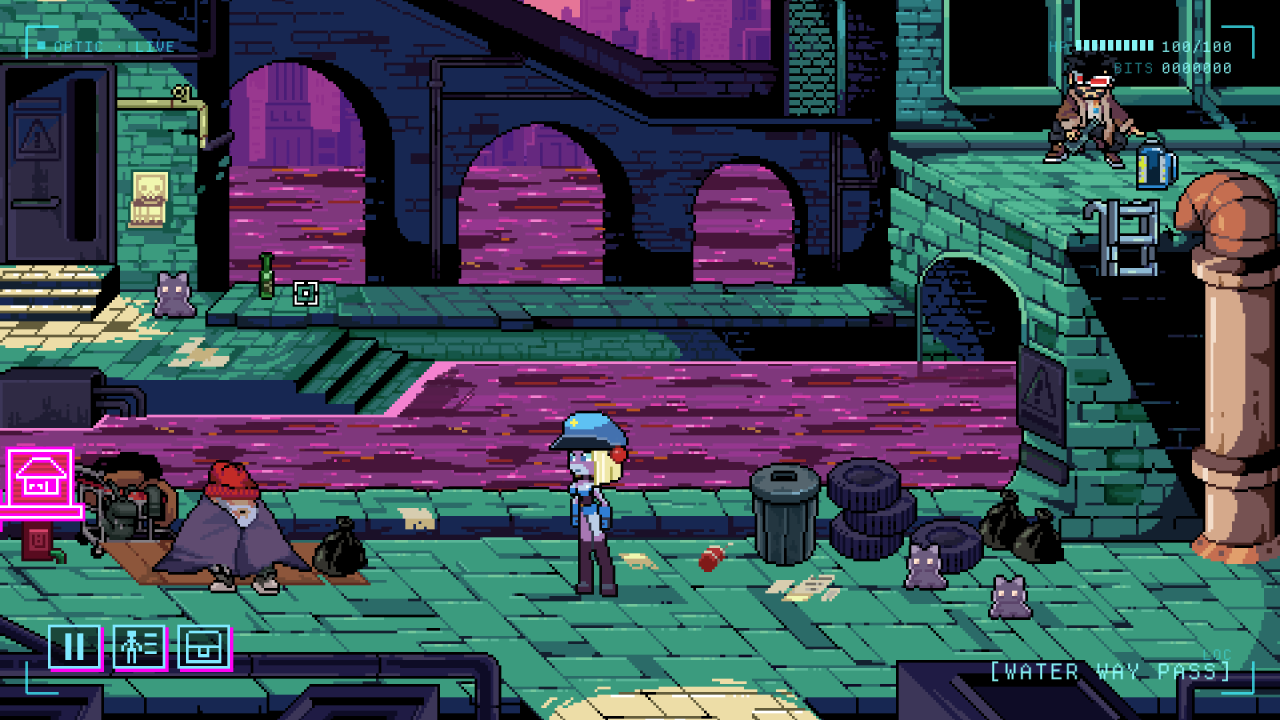
- Behind the homeless person in Water Way Pass, on the other walkway
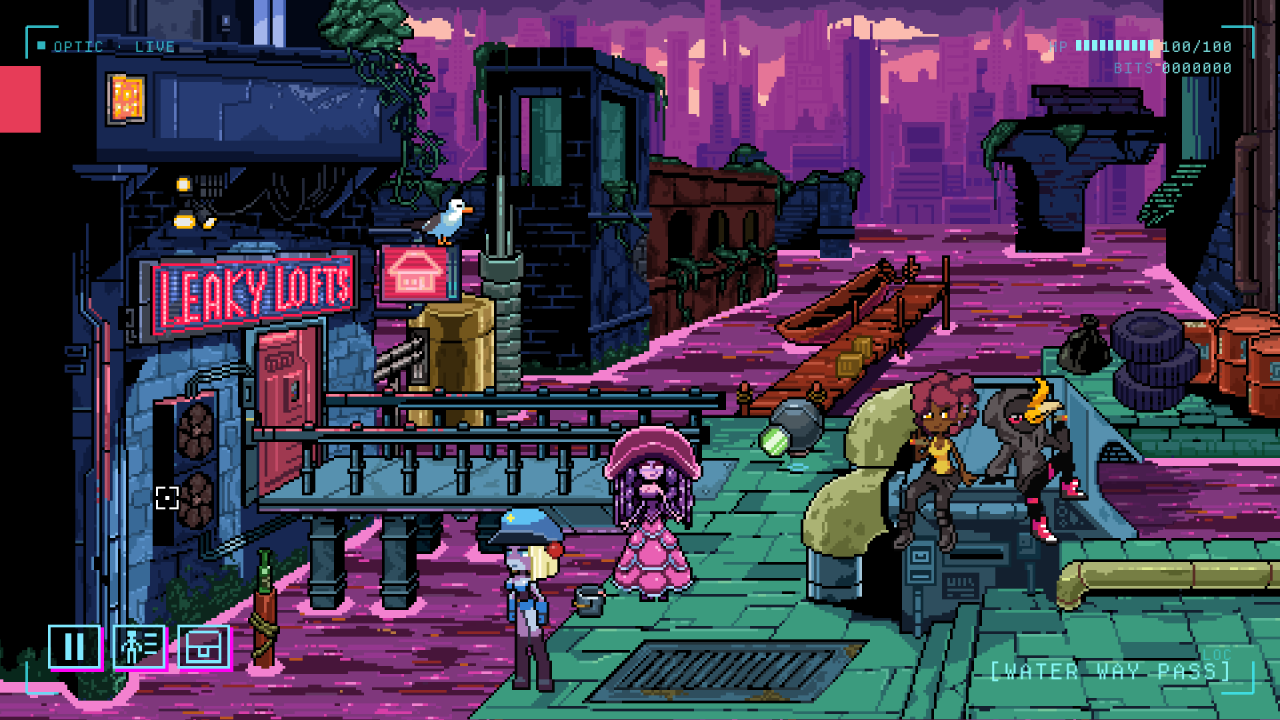
- Next to the Leaky Lofts entrance, on top of a pole in the water — this is the one that actually triggers the quest to start
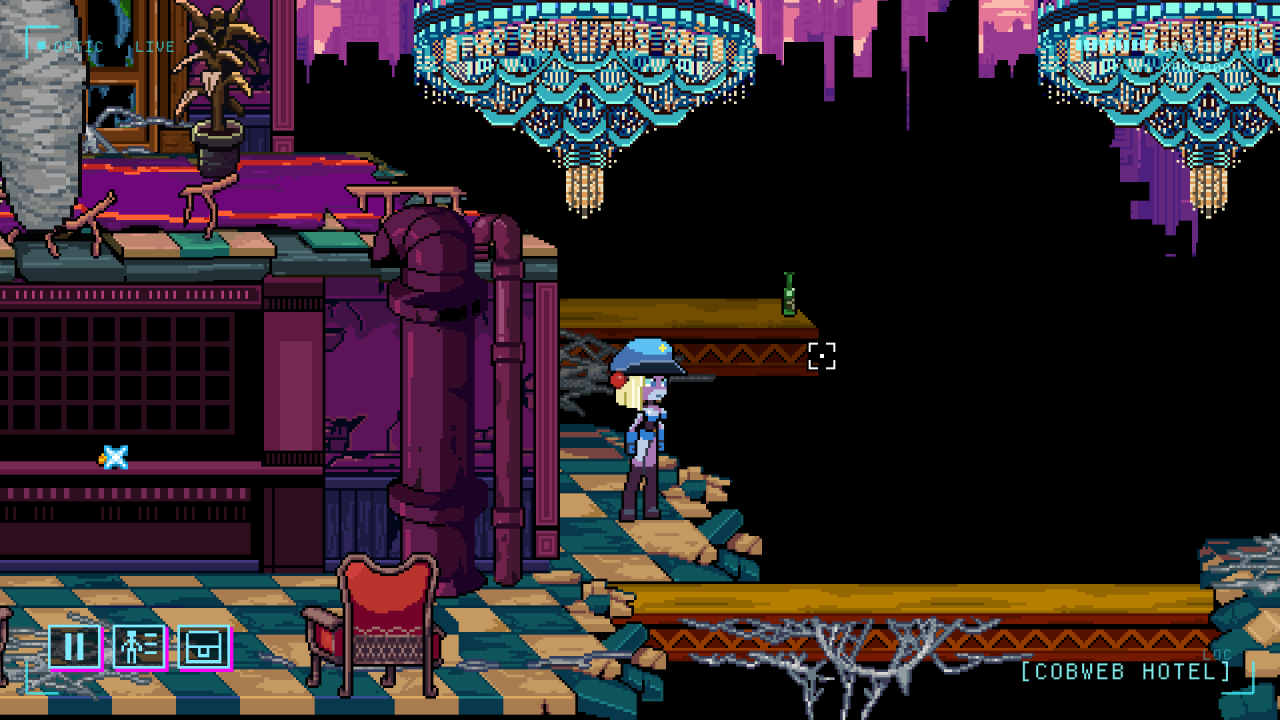
- Just past the receptionist entrance in the Cobweb Hotel, before you walk over the first girder
- Right before the fake rubber spike traps
- On the table just before the door with the guest who asks for more towels
- In the middle ring where a robot is hitting 4 different switches, right after Scrungly’s poison bottle challenge
- Right after the previous bottle, sitting atop some construction debris next to the bridge
The screenshots below walk you through each spot, so if a description doesn’t click, match it to the picture.

That’s verse 1 wrapped. Before you move on, double-check you’ve saved a file in front of the two Scrungly branches — and if you’re chasing Professional Detective, keep scanning everything you walk past in verse 2.
Verse 2 Achievements
There’s really only one thing worth doing in verse 2 beyond the mandatory story beats, and it’s the kind of task you’ll either set up now or forget entirely. So treat this as a patient investment rather than a verse-2 checklist.
Green Thumb won’t actually pop until the end of the game, but the work starts the moment you get your new home. Head to the second floor of Celium/Buster 09’s home and grab the gasoline can off the floor — and no, that’s not gasoline inside it. It’s water. Fitting, for a canister sitting in a robot’s house. Take it back to the dying tree in the middle of the Coinrust district and water it.
Then do the same thing every single verse. Miss one round and the tree stalls, so the routine matters more than the individual trip. By the time you reach verse 7 the tree will be fully grown, and if you’ve kept up the watering the achievement is yours.
Each time you water it, a list of names scrolls up on screen. You don’t have to read it — nothing gates on it — but these people paid to have their names carved there, so I always gave it a quick glance before moving on. Cheap way to appreciate a small detail.
Verse 4 Achievements
Verse 4 throws a branching choice at you early, and the two achievements tied to it are mutually exclusive in a single run. That’s exactly why the save-first habit I keep hammering on matters here — drop a manual save in The Roost before you commit to either side, and you can knock out both achievements without a full replay.
Friend to the Animals / Nothing Gets in My Way (branching)
While you’re hunting for The Roost in the Hyena verse, make your way to the Soggy Ankles district. You’ll find Olly and Frick getting held up by a squad of KDR soldiers. This is the fork. Talk to the soldiers and refuse to let them kill Olly — for that kindness Frick pledges to help you, you earn Friend to the Animals, and you walk away feeling better about yourself. Do the opposite and side with the soldiers to get Frick out of the way, and you earn Nothing Gets in My Way instead, along with whatever guilt comes with it. Save before you pick, then reload and take the other road so you’re not leaving an achievement behind.
Tasty Donites
Once you’ve resolved the standoff either way, a popper shows up in the screen to the right — the hub of Soggy Ankles — tucked under the bridge. Talk to him and, sure, agree to eat candy from a stranger; that’s clearly the wise move here. After your recovery, head back to him and don’t shoot him. Accept his quest to round up all his donites, then bring the boxes home.
| Box Location |
|---|
| By the ramen noodle boat |
| Inside the verde fresh convenience store |
| Next to Skeen’s Upgrad35 store by the stoplight — Stacy, the bird popper, is squatting beside it |
| At the Leaky Lofts in Water Way Pass, next to Patty and Nanner |
| Inside the Leaky Lofts, next to the elevator |
Turn all five boxes back in to him and the achievement is yours, plus a cassette for your trouble. The one next to Skeen’s Upgrad35 is easy to walk past since Stacy blends into the corner — I gave that spot a second look before moving on.
The Truth Hurts
In the KDR compound, get into the hangar where the jet and the mechanic are. On the right side a soldier stands guarding the boltcutters. Walk up to him and admit you snuck into the base. Your honesty — and your subsequent lack of a life — are both very impressive, and the achievement lands for it.
Control Your Lust!
Same hangar in the KDR compound, but this time head left into the showers. You’ll trigger a cutscene with The Rat. Once you can move again, walk left past the bison popper to hear a funny noise and get a flustered comment out of 09. Keep pacing back and forth in front of that same guy until Rat tells you to Control Your Lust! — that’s when the achievement unlocks. One caveat worth knowing: as of the 1.b version, you have to do this while Rat is still in the scene so she can say the line it’s tied to. In later versions this should be fixed, but if the achievement refuses to pop on the old build, that’s the reason. See the screenshot below for the shower area.
Verse 5 Achievements
Golden Voice is earned by taking a gold medal in the Siren Sing-Off at the oasis, and there’s one hard rule you need to respect: the auto-tuner is off the table. You have to sing it legitimately, which comes down to staying on rhythm and hitting the right keys or buttons in time with the arrows. I found it wasn’t especially brutal, but expect a try or two before the timing clicks — once it does, you’ll want to be dominating most of the contest to walk away with gold. Half-hearted runs won’t cut it.
The next two achievements share a single relationship track, so decide up front which one you’re chasing. Besties wants you to become Best Friends with the Rat, which mostly boils down to one general habit: be nice to her at every opportunity. That same instinct carries you through the Rat Hole achievement and honestly through most interactions in the game. The system hands out relationship points based on how you treat her and which choices you make, so the inputs stack.
A few specific beats matter. The Rat wants to be the one who swaps the items at the obviously trapped stairway at Lizard Rave Studios — let her do it rather than stepping in. You can pick up 2 points for dancing well during The Bat’s Buster gala. After you defeat the Hyena, you should encourage her instead of trying to protect her, though I’ll be honest that I’m not certain how much weight that last one actually carries. For the friendship route, humor her during the gala dance, tell her you feel platonic friendship toward her after the Hyena fight, and keep your strictly friendly intentions when you talk to her again at the Naughty Nook. Once that conversation is done, meet her at the Leaky Lofts and spend a nice night together to lock the friendship in.
Rat Hole is the same ride with the dial turned. This time you flirt or declare your romantic intentions at every opportunity instead of keeping it platonic, then spend the night at her place to pop the achievement. And turn the lights out before you leave — that’s not a mechanic, it’s just good manners, but the achievement expects you to actually do it.
One thing I want to flag honestly: you’re able to swap between friendship and romance later if you acted unsure earlier, but I haven’t personally tested that path, so if you’re aiming for a specific one of these two, commit to it as you go rather than banking on a late switch.
Verse 6 Achievements
Save right before you first talk to Poseidon. I can’t stress this enough — verse 6 splits hard into two routes and the achievements are locked against each other. Mugging Poseidon is the prerequisite for Anger the Fates, while Knighted by Poseidon is the only way to unlock Pleasing the Fates. One manual save placed before that conversation lets you clear both sides without replaying the whole verse.
| Merciful Route | Ruthless Route |
|---|---|
| Knighted by Poseidon | Mugging Poseidon |
| Gifted the Titan Heart | Stole the Titan Heart |
| Pleasing the Fates | Anger the Fates |
Knighted by Poseidon (save first)
After the Shrimp sends you into the water, limp your way along until you eventually reach the train car where Poseidon is waiting. When he offers to knight you, agree — you become Ser Buster 09 — and the trophy is yours.
Mugging Poseidon (save first)
Same setup, but when Poseidon makes the knighting offer, just steal the key instead of accepting. You get the achievement, plus a little guilt to carry around afterward.
Gifted the Titan Heart (save first)
In Tartarus, find the titan robot behind the gate in the top-right area. Talk to him or interact with his chest piece and choose to abandon your quest. After a bit of introspective back-and-forth, complete the puzzle or puzzles he asks of you, and the heart and the achievement land together.
Stole the Titan Heart (save first)
Run the same scene but simply take the heart instead of abandoning your quest. You pocket the heart, get the achievement, and get a firm reminder of how small you actually are.
Pleasing the Fates (save first)
This one only works if you were knighted by Poseidon first, so if you saved before that conversation you’re in good shape. You need to finish two of the three Tartarus puzzles the merciful way. For the medusa section, once you reach the end, wait a little while — a few minutes at most — until the last medusa floats off, then take the item it was guarding. You also need Gifted the Titan Heart so the titan hands his heart over of his own choosing. Finish the final section as normal and head to the fates. Hand over what they need for judgment and their eyes should glow green with descriptions of their approval. Accept the judgment and enjoy the fact that you didn’t act like a jerk.
Anger the Fates (save first)
Basically invert everything above. Steal the key, then smash an item over the medusa’s head — the rock from the prior verse, the one you get from the sirens, works nicely for this — and forcibly take the heart. Do it right and every fate’s eyes go red and they’re described as thoroughly disapproving. Ask for judgment and accept what’s coming to you.
One detail worth catching: talk to Rat (also Terrence) during your hallucinations on both routes and compare how differently those conversations play out. And unless you genuinely prefer living in that timeline, think twice about stealing the key — it locks you out of a gun charge upgrade.
Mental Health Day
Once you’re inside the Shrimp’s mansion and the popper at the start assigns your class, just keep asking Terrence for compliments over and over. I’m honestly a little jealous — I wish I had someone that supportive in my corner.
Verse 7 achievements
Verse 7 is where the game finally lets you fight the thing it’s been hinting at the whole time, and then immediately makes you deal with the person who caused all of it. Before you can even think about the Kraken, though, the game checks your sidequest homework — you can only fight it if you picked up every energy upgrade from the Ark sidequests, which means you must have finished Juiced as Hell, which in turn means you need Frenemies done. If you skipped either one, go back and clean them up now. There’s no alternate route in.
Once your energy upgrades are all accounted for, follow Doctor Eightball back under your couch after you escape the academy. Down there you’ll find a generator — charge it up, give your big final speech, and close it out by deciding to go fight the Kraken. That’s your launch point for the whole verse.
The Kraken
The Kraken hits harder than the bosses before it, but I didn’t find it dramatically harder — more of a stamina check than a skill wall. The one thing that genuinely mattered for me was sticking with the ammo you unlocked fighting Set, since it’s excellent for clearing out the wall of bullets this fight throws at you. Wasting time reloading uncommon ammo in the middle of a bullet storm is how you die here.
The fight runs in phases: destroy the claws first, then the tail, and only once you’re in the third phase can you finally damage the head. Clear all three and you move into the eyes phase. The eyes throw up shields once they’ve taken enough damage, and the fix is to swap to the right ammo type to strip them — charging your shots helps a lot with breaking those shields down. This is the part where being stubborn with one ammo type will cost you.
One thing I can’t stress enough: scan the Kraken before you advance to the eyes phase. It’s easy to tunnel on the boss health bar and forget, and by the time the phase flips you’ve lost your window for the scan.
Dr. Hydnellum
Beating the Kraken drops you straight into the Hydnellum fight. You could fight her the standard way, trading shots and dodging, but that drags on longer than it needs to. Just dump grenades on her for the entire fight — she can’t shoot them down, so the whole encounter collapses fast. Same rule as the Kraken applies here: scan her before she goes down, or you’re redoing the fight for a checkbox.
Kill Dr. Hydnellum
After the doctor’s health is gone, you get one last shot to spend. Put it between her eyes and the achievement is yours. It’s about as satisfying a finishing move as the game offers.
Spare Dr. Hydnellum
If you’d rather twist the knife without firing, do the same thing but aim your last shot anywhere except at her — an act of mercy that shatters her ego for good. It’s a genuinely mean way to win, and honestly kind of funny. Either branch clears the fight, so pick the one that fits how you’ve been playing.
Progression Achievements
These come from the combat mini-games, and they’re the kind of thing you can only miss if you spend the whole game dodging fights. Pick a fight with almost everything you run into and they’ll fall into place on their own. The milestones are:
- 100 Enemies Defeated
- 300 Enemies Defeated
- 600 Enemies Defeated
- 1,000 Bits Earned
- 5,000 Bits Earned
- 10,000 Bits Earned
- Shot 1,000 Bullets out of the Air
- Shot 3,500 Bullets out of the Air
The bits counter trips people up, so let me be clear about it: the game tracks what you’ve earned, not what’s sitting in your pocket. You don’t need to hoard 10,000 bits and sit on them — spend freely, and the total keeps climbing toward the milestones anyway. Same logic applies to the bullets you swat out of the air; just keep firing at incoming shots as you fight and the count builds.
Kitted Out
Buy every upgrade. Normal playthroughs generate more than enough bits for this, so if you’ve been fighting your way through the verses rather than sneaking past everything, you’ll clear it without grinding. I’ve seen people worry about the optional ammo upgrades from the Yapper merchant during The Bat’s sidequest — my read is those don’t count toward the achievement, but if you’ve hung onto every crown coin you found along the way, you’ll be able to afford the whole lot regardless.
That’s the last box ticked — The Key to the City is yours. Go do whatever else you feel like, or, you know, leave a nice review on the way out.