

I’m putting together a full breakdown of the ZED ZONE skill tree here — every node I could find, what it costs, what prerequisite it sits behind, and what the effect actually does once you’ve bought it. If you’re standing at the skill screen deciding where to dump your next dose, or you’re trying to plan a build before you ever touch the menu, this should give you the whole map in one place.
I wrote this up because the tree spreads across four branches and it’s genuinely easy to lose track of what feeds into what — you’ll buy something expecting a payoff and realize too late it needs a node two rows down. Everything below was checked against game version 1.0.17, so the numbers should line up with what you’re seeing. The branches are long, so I’ve split each of the big ones into two parts to keep it readable rather than forcing one endless table down your screen.
Overview
Four branches split the tree: Melee, Firearm, Physical, and Technology. Each one runs on its own colored dose currency, so the branch you pour doses into early shapes what you can afford later — you can’t just spend freely wherever you like. Melee and Firearm both feed their own combat identities, Physical keeps you alive and moving, and Technology opens the crafting and base-building side of the game.
Two mechanics matter before you read any table. First, prerequisites are real: most nodes sit behind an earlier node in the same column, and buying out of order simply isn’t an option. Second, several nodes repeat — you buy them, they cap, and you can buy them again for another tier of the same effect. Those repeatable boosts tend to be the quiet workhorses of a build, since the effect stacks rather than staying flat.
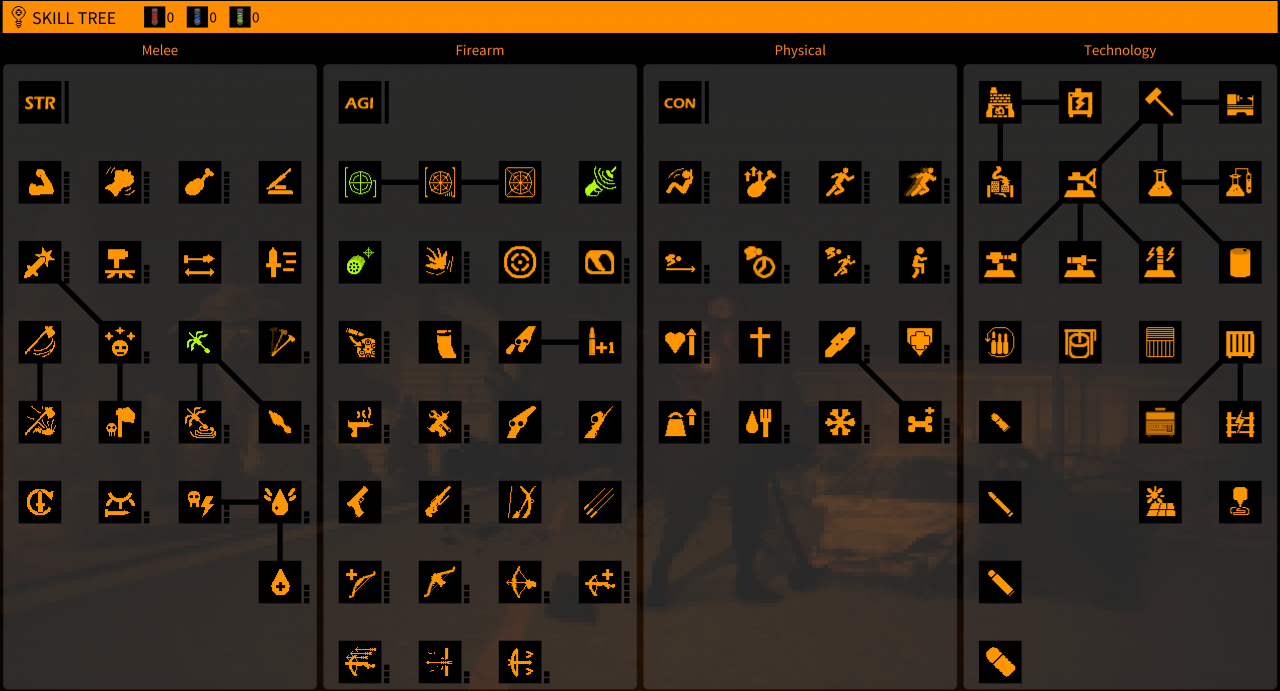
Everything below is pulled from game version 1.0.17, so the costs and effects should match what’s on your screen if you’re on that build. The screenshot above shows the tree layout as I worked through it.
Skill Tree
Before you scroll into the individual branches, it helps to know how the tree is actually put together, because it clarifies where the numbers on every table come from. The active skill nodes live in ZEDZONE_Data\resources.assets, and that same file carries each node’s cost, the prerequisite skill it hangs behind, which branch it belongs to, and flags such as active, toggleable, hidden, and in development. That last flag is worth remembering — not every node you might expect to see is finished. The same file is also where the crafting recipes for every item sit, including the station each recipe requires.
There are a couple of companion files alongside it. ZEDZONE_Data\globalgamemanagers acts as the game’s index of named resources, and ZEDZONE_Data\StreamingAssets\Localization\Localization_en_to_pl.csv holds the English skill text, item names, and building names. If you’re cross-checking a name or a tooltip against what shows in-game, the localization file is the one to open — it’s how I confirmed the exact wording of each skill before writing any of this down.
One thing that tripped me up early: the tree isn’t empty when you start. There are “kept” nodes that come pre-equipped, and it’s easy to assume a branch is shorter than it really is if you don’t account for those. Keeping them in mind makes the prerequisite chains read a lot more clearly as you plan a build.
Melee tree (part 1/2)
The Melee branch is where most players naturally start, and it’s also the branch I’ve spent the most Red Doses on. Everything here runs on Red Dose, which keeps the budgeting simple — if you’re going melee, that’s the currency you farm. The opening stretch is all repeatable five-tier stat boosts, and I’ll be honest: they look boring on paper, but the numbers ramp hard by tier V and they’re the foundation everything else sits on.
| Skill | Level | Cost | Total to Max | Requires | Effect |
|---|---|---|---|---|---|
| Muscle strengthening I | 1/5 | 1x Red Dose | 15x Red Dose | — | Increases melee attack damage by 10% |
| Muscle strengthening II | 2/5 | 2x Red Dose | — | — | Increases melee attack damage by 15% |
| Muscle strengthening III | 3/5 | 3x Red Dose | — | — | Increases melee attack damage by 20% |
| Muscle strengthening IV | 4/5 | 4x Red Dose | — | — | Increases melee attack damage by 25% |
| Muscle strengthening V | 5/5 | 5x Red Dose | — | — | Increases melee attack damage by 30% |
| Speed increase I | 1/5 | 1x Red Dose | 15x Red Dose | — | Increases attack rate of melee weapons by 10% |
| Speed increase II | 2/5 | 2x Red Dose | — | — | Increases attack rate of melee weapons by 15% |
| Speed increase III | 3/5 | 3x Red Dose | — | — | Increases attack rate of melee weapons by 20% |
| Speed increase IV | 4/5 | 4x Red Dose | — | — | Increases attack rate of melee weapons by 25% |
| Speed increase V | 5/5 | 5x Red Dose | — | — | Increases attack rate of melee weapons by 30% |
| Stamina consumption I | 1/5 | 1x Red Dose | 15x Red Dose | — | Reduces stamina cost of melee attacks by 10% |
| Stamina consumption II | 2/5 | 2x Red Dose | — | — | Reduces stamina cost of melee attacks by 20% |
| Stamina consumption III | 3/5 | 3x Red Dose | — | — | Reduces stamina cost of melee attacks by 25% |
| Stamina consumption IV | 4/5 | 4x Red Dose | — | — | Reduces stamina cost of melee attacks by 30% |
| Stamina consumption V | 5/5 | 5x Red Dose | — | — | Reduces stamina cost of melee attacks by 50% |
| Weapon Maintenance | 1/1 | 2x Red Dose | — | — | Reduces durability cost of melee weapons by 30% |
| Deadly Strike I | 1/5 | 1x Red Dose | 15x Red Dose | — | 5% chance for melee attacks to cause critical damage |
| Deadly Strike II | 2/5 | 2x Red Dose | — | — | 8% chance for melee attacks to cause critical damage |
| Deadly Strike III | 3/5 | 3x Red Dose | — | — | 12% chance for melee attacks to cause critical damage |
| Deadly Strike IIII | 4/5 | 4x Red Dose | — | — | 16% chance for melee attacks to cause critical damage |
| Deadly Strike V | 5/5 | 5x Red Dose | — | — | 25% chance for melee attacks to cause critical damage |
| Ground Slam I | 1/3 | 1x Red Dose | 6x Red Dose | — | Increases knockback force of melee attacks by 20% |
| Ground Slam II | 2/3 | 2x Red Dose | — | — | Increases knockback force of melee attacks by 40% |
| Ground Slam III | 3/3 | 3x Red Dose | — | — | Increases knockback force of melee attacks by 60% |
| Polearm Mastery | 1/1 | 2x Red Dose | — | — | Skilled with spears. Increases melee attack range by 15% |
| Blade Mastery | 1/1 | 2x Red Dose | — | — | Skilled with bladed weapons. Increases melee attack rate by 12% |
| Heavy Strike I | 1/1 | 3x Red Dose | — | — | Hold attack 0.6s+ and release for a heavy strike: damage +60%, knockback +50%, stamina cost +50%. Stamina doesn’t regen while raised. |
| Stagger I | 1/2 | 2x Red Dose | 5x Red Dose | Deadly Strike | Monsters hit by a melee critical are stunned for 0.8s. Stunned low-health monsters can be executed. |
| Stagger II | 2/2 | 3x Red Dose | — | Deadly Strike | Monsters hit by a melee critical are stunned for 1.2s. Stunned low-health monsters can be executed. |
| Grapple | 1/1 | — | — | Grapple (kept) | Use the grapple for quick maneuvers or to grab enemies. Need to equip a grappling hook. |
| Combo Strike I | 1/2 | 2x Red Dose | 5x Red Dose | — | Swing again within 1.5x your attack interval to chain. The 3rd hit is a finisher with 35% more damage. |
| Combo Strike II | 2/2 | 3x Red Dose | — | — | Finisher damage increased by 60% and its knockback is doubled. |
| Heavy Strike II | 1/1 | 6x Red Dose | — | Heavy Strike | Hold attack 1.5s+ and release for a stage II heavy strike: damage +140%, knockback doubled, stamina cost doubled. Zombies hit suffer broken bones and are stunned for 1s. |
| Executioner I | 1/2 | 2x Red Dose | 5x Red Dose | Stagger | Raises the health threshold for executions by 50%. |
| Executioner II | 2/2 | 3x Red Dose | — | Stagger | Raises the health threshold for executions by 100% and reduces execution stamina cost by 50%. |
| Grapple-range increase I | 1/3 | 1x Red Dose, 1x Rope | 6x Red Dose | Grapple | Increased range of grappling hook |
| Grapple-range increase II | 2/3 | 2x Red Dose, 2x Rope | — | Grapple | Increased range of grappling hook |
| Grapple-range increase III | 3/3 | 3x Red Dose, 3x Rope | — | Grapple | Increased range of grappling hook |
| Grapple-lightweight I | 1/3 | 1x Red Dose | 6x Red Dose | Grapple | 25% reduced stamina consumption when using a grapple |
| Grapple-lightweight II | 2/3 | 2x Red Dose | — | Grapple | 40% reduced stamina consumption when using a grapple |
| Grapple-lightweight III | 3/3 | 3x Red Dose | — | Grapple | 65% reduced stamina consumption when using a grapple |
| Roll Counter | 1/1 | 3x Red Dose | — | — | Your first melee attack within 1.5s after a roll is a guaranteed critical and costs no stamina. |
| Ambush I | 1/2 | 2x Red Dose | 5x Red Dose | — | Melee damage +100% against monsters that have not noticed you, and the hit does not alert others. |
| Ambush II | 2/2 | 3x Red Dose | — | — | Melee damage +200% against monsters that have not noticed you, and the hit does not alert others. |
| Second Wind I | 1/3 | 2x Red Dose | 9x Red Dose | — | Restores 10 stamina on each melee kill. |
| Second Wind II | 2/3 | 3x Red Dose | — | — | Restores 20 stamina on each melee kill. |
A few things worth flagging before you start pouring Red Doses in. Muscle strengthening tops out at a 30% damage bump across all five tiers, and the cost climbs with each level — that 15x Red Dose “total to max” is the real number you’re committing to, not a one-time spend. Same story for Speed increase and Stamina consumption. I wouldn’t rush these to tier V on day one; grab a couple of tiers early so you can actually feel the swing speed and stamina drain improve, then top them off once your dose income is steadier.
Weapon Maintenance is the quiet hero here. It’s only 2x Red Dose for a flat 30% durability save on all melee weapons, and that saves you a fortune in repair materials over a run. I picked this up early and noticed the difference immediately — fewer trips back to a bench to patch up my blade.
Deadly Strike is the node everything else in the branch hangs off. Both Stagger and Executioner sit behind it, so if you want the stun-and-execute chain you’re buying the crit chance first whether you like it or not. The good news is the crit scaling is worth the cost — 25% at tier V turns a lot of swings into stuns, and stunned low-health monsters are execution fodder. I’d recommend committing to at least Stagger I once you have Deadly Strike ranked, because that 0.8s stun window completely changes how you handle packs.
Heavy Strike I unlocks a held attack for +60% damage and +50% knockback, but the stamina penalty and delayed regen while raised means you commit to the swing. Heavy Strike II, for 6x Red Dose behind it, jumps to +140% damage and breaks bones on zombies for a 1s stun — that bone-break is the payoff that makes the whole hold-and-release playstyle click for me. If you’re going to run heavy weapons, budget for both tiers.
Combo Strike rewards rhythm: swing again inside 1.5x your attack interval to chain, and the third hit lands as a finisher for 35% extra damage — upgraded to 60% and doubled knockback at tier II. It’s not flashy, but chaining finishers on a crowd is one of the more satisfying ways to spend stamina, especially once Second Wind starts refunding 10 (then 20) stamina per melee kill.
Grapple itself is free — it’s a kept node, so it’s already there from the start. What you pay for are the upgrades, and the Grapple-range increase tiers are the only place in the branch that also costs Rope on top of Red Doses. Don’t overlook that crafting material requirement; I got caught short on rope the first time I tried to buy tier I. The Grapple-lightweight tiers are pure Red Dose and cut stamina use by up to 65%, which pairs nicely with a mobility-heavy build.
Two sleeper picks I’d point you toward: Roll Counter (3x Red Dose, first melee attack within 1.5s of a roll is a guaranteed crit and free on stamina) and Ambush (melee damage roughly doubles, then triples, against unaware monsters without alerting others). Roll Counter in particular quietly solves the stamina problem during evasive fights, since that opener swing costs nothing.
Melee tree (part 2/2)
The back half of the Melee branch is where the tree stops being about raw weapon handling and starts rewarding you for staying on the offensive. Second Wind III sits at 3/3 and costs 4x Red Dose — you’ll need to have taken the earlier tiers to reach it. What it gives you is 30 stamina restored on each melee kill, plus a stamina regen that keeps ticking for 10s afterward. If you’ve been running dry mid-fight, this is the node that fixes it.
From there the branch forks into a damage-and-sustain chain that I think is the real prize of the melee tree. Bloodlust I costs 3x Red Dose (7x Red Dose to fully max) and requires Second Wind. On any melee kill you gain Bloodlust for 6s: melee damage +15% and move speed +8%, and further kills refresh the duration — so as long as you keep swinging and connecting, the buff never drops. Bloodlust II (2/2, 4x Red Dose, still gated behind Second Wind) pushes it to 8s with melee damage +30% and move speed +12%. That’s a meaningful jump, and it changes how aggressively you can chain encounters.
Bloodthirst then layers healing right on top of Bloodlust, and you’ll need Bloodlust as its prerequisite before any tier unlocks. The three levels scale the HP restore per Bloodlust kill:
- Bloodthirst I — 1/3, 3x Red Dose, restores 15 HP per melee kill while in Bloodlust.
- Bloodthirst II — 2/3, 4x Red Dose, restores 25 HP.
- Bloodthirst III — 3/3, 5x Red Dose, restores 35 HP.
Twelve Red Doses in total gets you the whole Bloodthirst line, and honestly the payoff is worth it if you’re building around sustained melee. Between Second Wind’s stamina refund and Bloodthirst’s HP regen, you become a self-feeding engine — every kill pays back both resources you spent to get it. The catch is purely economic: this whole chain runs on Red Doses, and that’s the currency your other melee upgrades are also pulling from. I’d rather bank for the Bloodlust/Bloodthirst stack than spread doses thin across smaller nodes, because the kill-refresh mechanic only feels good once the tiers are high enough to matter.
Then there’s Strength Boost, which is the repeatable node of this tree. It doesn’t sit behind anything — you can take it 1 through 20 times, 2x Red Dose at level one up to 40x Red Dose at level twenty (the cost climbs +2 per level), for a total of 420x Red Dose if you somehow max all twenty. Every level is +1 Strength permanently, and Strength feeds melee damage, carry weight, and how easily you break doors and windows. Twenty levels means +20 total Strength.
What I’d flag about Strength Boost is that it looks like a cheap little stat node and quietly isn’t — twenty levels is a serious Red Dose commitment, and the carry weight and break-object bonuses are easy to underestimate until you’re hauling loot or trying to force your way into a building. Buying a few early levels is genuinely noticeable; chasing all twenty is a long-term project. Treat it as the thing you dump spare Red Doses into once your core combat nodes are settled, not a sprint.
Firearm tree (part 1/2)
Moving off the melee side, the Firearm branch is where the Blue Doses go — and it’s the branch I’d argue demands the most discipline about prerequisites, because the two strongest nodes up top sit behind gear you have to be carrying rather than anything you buy in the tree itself. The CAS combat assist system and the Focused Laser Cannon are both marked as kept skills tied to the CAS Computer System and Laser Hand Cannon respectively, so don’t expect to unlock either with doses alone. The CAS system runs ballistic calculation to give you powerful aiming assistance, and once it’s active it pushes 80% increased damage on hit — with the catch being you need the CAS computer equipped for any of it to function. Two upgrades bolt onto it: the CAS-battery upgrade (1× Blue Dose) improves charge speed by 20% and battery life by 30%, and the CAS-computing upgrade (1× Blue Dose, gated behind the battery upgrade) bumps CAS damage to 140%. If you’re running the computer anyway, those two are cheap and worth grabbing.
The Focused Laser Cannon is the flashier pick — mastering the laser cannon lets the focused laser deal massive area damage, balanced against what the node itself calls significant cooldown time. The Western Gunslinger node (6× Blue Dose) is a different beast entirely: with a revolver equipped it auto-targets enemies and lets you fire off rapid consecutive shots on a 20-second cooldown. I like it more than it looks on paper, mostly because revolver users get a panic button that also happens to be accurate.
From there the tree opens into the stacking core nodes, and these are where most of my Blue Doses end up. Here’s the full spread with the cumulative cost and the effect at each tier:
| Node | Levels | Per-Level Cost | Total to Max | Effect at Max |
|---|---|---|---|---|
| Crit hit | 1–5 | 1/2/3/4/5× Blue Dose | 15× Blue Dose | 25% chance to cause critical damage |
| Aiming | 1–5 | 1/2/3/4/5× Blue Dose | 15× Blue Dose | 35% increased shooting accuracy |
| Trigger update | 1–4 | 1/2/3/4× Blue Dose | 10× Blue Dose | 20% increased fire rate |
| Fast loader | 1–5 | 1/2/3/4/5× Blue Dose | 15× Blue Dose | 35% faster ranged reload |
| Magazine reload | 1–3 | 1/2/3× Blue Dose | 6× Blue Dose | 40% faster magazine reload |
Crit hit climbs 5% → 8% → 12% → 16% → 25%, and the jump from tier four to tier five is the one that actually makes the line feel finished — everything before it is incremental, the last point is a real spike. Aiming goes 10% → 15% → 20% → 25% → 35% accuracy, which is the node I’ll usually take to tier two early and leave parked until my other firearms are stable, since the intermediate steps do plenty on their own. Trigger update tops out at 20% fire rate across four levels for 10× Blue Dose total, and Fast loader matches the 35% ceiling of Aiming across five levels for 15×.
Magazine reload is the odd one in this cluster and the most efficient: three levels, 6× Blue Dose total, and it hits 40% faster magazine reloading — 20% at tier one, 30% at tier two, 40% at tier three. If you’re spending Blue Doses cautiously, this is the value pick of the whole group.
Then there are the special reload mechanics, and these are where reload speed gets genuinely fiddly. Tactical reload (1× Blue Dose) applies to weapons with built-in magazines — shotguns, bolt-action rifles, that family — and lets you load two rounds at a time, but drops reload speed by 25% as the trade. Whether that’s a win depends on how the weapon’s magazine works, and honestly I’d read your weapon list before committing. Chamber +1 (1× Blue Dose, gated behind Tactical reload) slots one extra round into the chamber after a reload, where the weapon supports it. Small, but it’s the kind of thing that saves you a shot in a bad moment.
Barrel Cooling runs three tiers at 2/3/4× Blue Dose (9× total) for 30% → 50% → 100% increased firearm cooling speed, and each tier explicitly notes that overheat jams become less likely — that’s the real payoff if you’re running anything automatic. Ranged Weapon Maintenance mirrors it at the same 2/3/4× Blue Dose structure (9× total), cutting durability loss by 20% → 35% → 50%. If you care about keeping your guns alive through long runs, that second one pays for itself in repair materials faster than you’d think.
The weapon experts are flat, single-level damage buys at 2× Blue Dose each: Shotgun expert (+15% shotgun damage), Rifle expert (+15% rifle damage), and Pistol expert (+15% pistols and revolvers). No prerequisites, no scaling — just pick the one that matches the gun you actually carry.
Airgun Expert is different: three tiers at 1/2/3× Blue Dose (6× total), and the effect is entirely about charge speed. Tier one gets you relatively fast, tier two faster, tier three fastest. If you use airguns at all, the first tier is the one that changes how the weapon feels; the upper tiers are polish.
The bow end of this half starts with two utility nodes. Fast drawing (2× Blue Dose) cuts bow draw time by 30%, and Arrow recovery (2× Blue Dose) gives fired arrows a 50% chance to be reusable — which is quietly the better economic pick of the two if you’re shooting a lot. Bow Expert then scales across five levels at 1/2/3/4/5× Blue Dose (15× total): 10% → 20% → 30% → 40% → 50% bow damage. And this half closes on Steady Arm I (1× Blue Dose, part of a three-tier line costing 6× Blue Dose total), which reduces stamina cost by 20% while drawing a bow. I’ll pick that thread up in the next part.
Firearm tree (part 2/2)
Steady Arm stays cheap to finish. Level II drops the draw stamina cost to 30% for 2× Blue Dose, then level III pushes it all the way to 50% for 3× Blue Dose — which brings the whole three-tier line to 6× Blue Dose if you factor in the first rank from the previous part. If you’re spending a lot of time at full draw waiting for a clean shot, that final tier is money well spent.
Then Full Draw does something different. Rank I costs 2× Blue Dose and removes stamina drain entirely once the bow is fully drawn; rank II (3× Blue Dose, 5× Blue Dose total) also lets your stamina tick back up normally while you hold. That regen detail is the reason I’d push through to the second rank rather than stopping at the first — otherwise you’re holding a draw on a dead stamina bar and the whole point of the node gets awkward.
Crossbows get their own damage line in Crossbow Expert, running five ranks across 1/2/3/4/5× Blue Dose for 15× Blue Dose total: 10% → 20% → 30% → 40% → 50% crossbow damage. I’d treat the first rank or two as good value and only push to V if crossbows are genuinely your main weapon. On top of that, Crossbow Fast Reload runs three ranks (1/2/3× Blue Dose, 6× total) for 20% → 30% → 50% reload speed. Combined with the expert line, a fully kitted crossbow build turns into a very different weapon from what you start with.
If there’s a node in this branch I’d tell you not to skip, it’s the penetration tiers. Bolt Penetration I costs 3× Blue Dose and lets bolts pierce 1 target, with damage dropping 30% per pierce; rank II (5× Blue Dose, 8× total) pierces 2 targets at the same penalty. Arrow Penetration mirrors it for bows: rank I for 3× Blue Dose pierces 1 target, rank II for 5× Blue Dose (8× total) pierces 2, again at 30% damage falloff per pierce. Lining up a line of enemies and watching that 30% dropoff math play out is one of those small satisfaction moments — you have to actually steer your shots into clusters for these to pay off, which changes how you approach a fight.
Last in the branch is Agility Boost, a repeatable that you can pick up 20 times. The cost structure is a little unusual: 2× Blue Dose at the first level, rising by 2× per level (so 4×, 6×, and so on) up to 40× at level 20, for a staggering 420× Blue Dose to fully max. Each rank is a permanent +1 Agility, and that Agility improves firearm accuracy, reload speed, and sprint/roll speed. Handy as a one-off when you have spare Blue Doses, but I wouldn’t chase 20 ranks unless you’re swimming in them late in a run.
Physical tree (part 1/2)
Switching over to Green Doses, the Physical branch is where survivability lives — stamina economy, movement, health, and the little quality-of-life perks that keep a run from falling apart. Every node here spends the same currency, so budget carefully; I’ve spent a lot of green just chasing end-of-track bonuses and learned to pace it.
Stamina pool and regeneration
The Max stamina chain runs five levels, costing 1x → 5x Green Dose in order, for 15x Green Dose total. Each rank stacks a flat boost: +10, +20, +30, +40, then +50 points at the top. If you sprint and roll constantly, this is where a lot of your green should go first.
Paired directly after it is Stamina recovery, another five-level chain at the same 1x–5x cost, again 15x Green Dose to max. The percentages climb 20%, 40%, 60%, 80%, and 100% at level five — so a full investment doubles your regen speed. In practice, I’d rather have regen than raw pool if I had to pick, since it lets you re-engage sooner after disengaging.
Marathon runner is the third five-level chain (1x → 5x, 15x Green Dose total). It cuts the stamina cost of running by 10%, 20%, 30%, 40%, then 50% at rank five. Not flashy, but if long treks between points of interest are eating your bar, this is the tax you pay for not caring about it anymore.
Movement and stealth
Sprint speed is a shorter four-level chain — 1x, 2x, 3x, 4x Green Dose, 10x Green Dose total. The speed bonus goes 3%, 6%, 9%, then 12% at rank four. Small on paper, noticeable in the field.
Rolling distance caps at three levels (1x, 2x, 3x, 6x Green Dose total) and pushes roll distance up 35%, 65%, then a full 100% at rank three. Rolling to reposition becomes genuinely useful once this is maxed — you clear more ground per roll than you’d expect.
Bullet time is one of the more interesting picks in the branch. Three levels at 2x, 3x, 4x Green Dose (9x total), and each grants a brief slow-motion window after a roll: 0.5 seconds at rank one, 0.75 at rank two, and a full 1 second at rank three. It’s not a combat toggle — you’re buying a short reaction window that fires automatically the moment you roll.
Rolling Sprint follows right after, also three levels at 2x, 3x, 4x (9x Green Dose total). Rolling grants a short acceleration effect lasting 2 seconds at rank one, 3.5 at rank two, and 5 at rank three. Stacks naturally with Rolling distance if you’re building a dodge-heavy playstyle.
Light Step rounds out the movement cluster — three levels at 1x, 2x, 3x Green Dose (6x total). It shrinks the noise radius of your footsteps by 20%, 35%, then 50%. I underestimated this until I started trying to move through hostile territory without pulling everything within earshot.
Health and damage mitigation
Max Health is a five-level chain at 1x → 5x Green Dose (15x total). The health bonus steps up 5%, 10%, 16%, 22%, then 30% at rank five. Solid across the board — no reason it wouldn’t be on most builds.
Hp recovery runs the same five-level shape and cost (15x Green Dose total), raising recovery speed by 20%, 35%, 50%, 60%, then 70% at the top. Paired with a big Max Health pool, it’s what actually keeps you in fights.
Wound Care is a three-level chain at 1x, 2x, 3x Green Dose (6x total). Rank one cuts bleed chance on hit by 30% and damage to the struck limb by 20%; rank two pushes those to 50% and 30%; rank three hits 70% and 50%. If you’ve ever limped away from a fight with a shredded limb, this is the answer to that exact problem.
Tough Body is another three-level chain at 2x, 3x, 4x Green Dose (9x total), reducing the intensity of all negative statuses by 10%, 18%, then 28%. Broad but modest — worth it if you find yourself getting hit with state effects more than raw damage.
Carry and survival economy
Carry Capacity is a five-level chain at 1x → 5x Green Dose (15x total), raising your weight limit by 5 kg, 10 kg, 16 kg, 22 kg, then 30 kg at rank five. Anyone who’s ever had to leave loot behind will feel the appeal of this one immediately.
Wilderness Metabolism opens a two-part run in this half of the branch. Rank one costs 1x Green Dose and reduces hunger and thirst consumption by 12%; rank two costs 2x and pushes it to 22%. The full chain totals 6x Green Dose, and it continues in the next part of the tree.
Physical tree (part 2/2)
Rank three of Wilderness Metabolism finishes the hunger and thirst line: 3x Green Dose drops consumption by 32%. If you’ve been running rank two and still find yourself chewing through food, this last tier is where the branch finally pays for itself.
Cold Resistance opens its own three-rank chain next, priced at 1x, 2x, and 3x Green Dose across the tiers — 6x total to max. The cut to environmental body heat loss steps up as 20%, 35%, then 50%. I’d call this the kind of node you buy the moment you notice your temperature bar reacting to weather rather than to actual damage; half the heat loss gone at rank three makes cold zones noticeably less of a chore.
Then comes Limb Recovery, and this chain is longer than it looks. Four ranks, each gated behind Wound Care, costing 1x, 2x, 3x, and 4x Green Dose — 10x in total. Injured limbs recover 20% faster at rank one, then 30%, 40%, and finally 50% at the top. The rank labels in-game read I, II, III, and then IIII for the fourth tier, which caught me off guard the first time I read the list. If you rely on keeping all four limbs functional in a fight, this is the branch’s real insurance policy, even if the total dose bill stings.
The closer is Constitution Boost, and it works differently from the rest of the branch. It’s a repeatable node: the price starts at 2x Green Dose and climbs by +2 each level, so the cost runs 2, 4, 6, 8 … all the way to 40x at level 20. Buying all 20 levels sets you back 420x Green Dose total. Each purchase permanently adds +1 Constitution, which improves your HP and stamina caps and your debuff resistance, for a maximum of +20 if you go the whole way. I think of it as the long-term savings account of the physical tree — expensive, slow, and quietly the best thing on the list if you’re playing the long game.
Technology tree (part 1/2)
If the melee and firearm branches are about how hard you hit, the Technology tree is about what you’re allowed to build — and it quietly determines whether the rest of your run is comfortable or a slog. I’ll be honest, this is the branch I underestimated early on. A lot of these nodes aren’t stat boosts at all; they just unlock a workstation, and the workstation then opens up dozens of crafting recipes that don’t appear anywhere else.
Before diving into the list, one distinction matters a lot for reading the table below. Nearly every node here has a “cost” in materials you actually burn when you buy it, and a separate “also needs” set of things you must already have in your inventory (kept, not consumed). It’s easy to confuse the two. The costs are what stings — those Rock, Metal Component, Copper Wire, and Harmonic Drive stacks disappear for good once you commit. Miss that and you’ll be grinding a component back that you thought you could spare.
| Skill | Level | Cost (consumed) | Also needs (kept) | Requires skill |
|---|---|---|---|---|
| Stone furnace | 1/1 | 10x Rock | — | — |
| Electric Furnace | 1/1 | 10x Copper Wire, 1x Mechanical Components | Stone furnace | Stone Furnace |
| Workbench | 1/1 | Stone Axe, Stone Hammer | — | — |
| Simple lathe | 1/1 | 10x Metal Component | Workbench | — |
| Mold WorkStation | 1/1 | 10x Waste Plastic | Stone furnace | — |
| Auto Turret Base | 1/1 | 1x Laptop, 2x Harmonic Drive | Workbench | — |
| Chemical bench | 1/1 | 10x Metal Component | Workbench | — |
| Medicine bench | 1/1 | 3x Nitric Acid Powder | Chemical bench | — |
| Machine Gun Turret | 1/1 | 2x Harmonic Drive, 30x 5.56x45mm NATO | Auto Turret Base | — |
| Laser Turret | 1/1 | 1x Laptop, 1x Vehicle Battery | Auto Turret Base | — |
| Tesla Turret | 1/1 | 1x Melee Electrify Component, 1x Vehicle Battery | Auto Turret Base | — |
| Canning | 1/1 | 20x Meat, 20x Salt | Chemical bench | — |
| Ammo loader | 1/1 | 10x Metal Component, 1x Grindstone | — | — |
| Water well | 1/1 | 10x Metal Component | — | — |
| Animal traps | 1/1 | 3x Dead Rat, 3x Dead Crow | — | — |
| Appliances | 1/1 | 10x Copper Wire, 1x Light Bulb | — | — |
| Small caliber ammo | 1/1 | 10x 9x19mm | — | — |
| Portable Appliances | 1/1 | 10x Copper Wire, 1x Light Bulb, 1x Vehicle Battery | Appliances | — |
| Electric Fence | 1/1 | 20x Iron Wire, 10x Copper Wire | Appliances | — |
| Rifle caliber ammo | 1/1 | 10x 7.62x39mm | — | — |
| Solar Power | 1/1 | 4x CNC Component, 10x Copper Wire | — | — |
Technology tree (part 2/2)
Past the solar grid, the tech branch narrows down to a handful of late-game unlocks — but they’re the ones that tie your whole base together. The first thing I’d flag is that 3D printing isn’t a small quality-of-life node. Pulling it costs 10x Plastic Material with nothing kept back, and the payoff is an entire production line rather than a single object. Once I had it, the 3D Printer became my go-to bench for magazines and lures I’d otherwise be hand-crafting forever.
Here’s the full spread of what that node opens up, so you can see exactly how much it’s gating:
| Node | Level | Cost (consumed) | Also Needs (kept) | Effect |
|---|---|---|---|---|
| 3D printing | 1/1 | 10x Plastic Material | — | Master 3D printing technology; unlocks the 3D Printer |
| Big caliber ammo | 1/1 | 5x 300 Magnum | — | Craft 300 Magnum and .50 BMG |
| 40mm grenade | 1/1 | 3x 40mm Grenade | — | Craft 40mm Grenade |
The 3D Printer build itself is only half of it — most of the value sits in what you can now craft at it. From the 3D Printer alone you get the Plastic Lure, Colored Plastic Lure, Crab Lure, and Tuna Lure (the Spinner Metal Lure stays a hand-crafting recipe). The magazine list is where it really earns its keep: the 9mm Magazine (30 Rounds), 9mm Magazine (40 Rounds), 5.56 Magazine (30 Rounds), .22LR Drum, .45 ACP 26rd Magazine, 5.56 Belt (200 Rounds), 7.62 Extended Magazine, and 7.62 Drum all print here. A few overlap with the Mold Workstation too — the 9mm Drum, .22LR Drum (110rd), .45 ACP Drum (50 Rounds), 5.56 Drum (60 Rounds), and 7.62 Drum, plus the .300 Magnum Rifle Magazine (5 Rounds) and .50 BMG Magazine (5 Rounds). That overlap matters to me — it means I don’t have to keep the printer busy on drums I can mold instead.
The last two nodes are pure ammo unlockers, and they both feed the Ammo Reloader you presumably already built back in the first half of this branch. Big caliber ammo costs 5x 300 Magnum and lets you manufacture 300 Magnum and .50 BMG at the loader. 40mm grenade is the cheapest of the trio — 3x 40mm Grenade — and simply adds the 40mm Grenade recipe. I’d grab the 40mm one early if you run launchers, because three grenades is nothing compared to what you’ll be throwing downrange afterward.
What strikes me about the whole technology branch, honestly, is how quietly it controls the pace of everything else. You can have a perfect melee build and it’ll still stall if you can’t reload at scale — the ammo and crafting nodes here are what turn a surviving character into a self-sufficient one, and the plastic and grenade costs are small prices for breaking that ceiling.
Conclusion
That’s the technology tree from top to bottom. Take the crafting and ammo unlocks in the order your build actually needs them — once the printer and reloader are online, the rest of the survival game gets a lot gentler.